Samsung Refrigerator Ice Maker Assembly DA97-18859A (Replaces DA97-13718C)

Samsung Refrigerator Ice Maker Assembly DA97-18859A (Replaces DA97-13718C)

Price
$221.20

XPart Number: 9665541374241   |   GTIN: 7167358232471

Buying Option : OEM
Condition: New

Product variant with selected options does not exist!

Frequently Bought Together

Guaranteed to fit your model: Need help? Call 1-877-899-7278

Shipper / Seller: XPart Supply Ltd.

Professional Repair Time: 30-45 minutes
DIY Repair Time: 45-60 minutes
Difficulty Rating: Moderate (2.5/5) — Requires basic mechanical skills, careful handling of water connections, simple electrical connector disconnection, attention to detail, patience for first ice production cycle

  • Ice maker not producing ice at all
  • Ice maker producing ice slowly or incompletely
  • Ice maker not ejecting ice cubes (ice stuck in mold)
  • Ice maker leaking water
  • Ice maker making unusual grinding or clicking sounds
  • Ice cubes being malformed or hollow
  • Ice maker cycling continuously without producing ice
  • Ice maker not filling with water
  • Ice maker motor not running
  • Ice maker heating element not working
  • Ice mold cracked or damaged
  • Ejector blades broken or not rotating
  • Ice maker thermostat failure
  • Ice maker not harvesting ice

Ice Maker Assembly, Ice Maker Module, Ice Maker Unit, Automatic Ice Maker, Ice Production System, Ice Harvesting Assembly

Part number DA97-18859A replaces DA97-13718C, DA97-13718A, DA97-13718B, DA97-15217D, DA97-08259A, DA97-18859A, AP6329377, PS12074067, EAP12074067, 4809480

Samsung, Dacor

Fits Models: (Ctrl+F and Enter Your Model Number)

RF23HCEDBSR/AA, RF22M9581SG/AA, RF22M9581SR/AA, RF24FSEDBSR/AA, RF22KREDBSG/AA, RF22KREDBSR/AA, RF23HCEDBBC/AA, RF22K9381SG/AA, RF23J9011SR/AA, RF23J9011SG/AA, RF22K9381SR/AA, RF23M8590SR/AA, RF24J9960S4/AA, RF23M8070SR/AA, RF23M8090SG/AA, RF23M8090SR/AA, RF23M8590SG/AA, RF23M8570SG/AA, RF23M8960S4/AA, RF22N9781SR/AA, RF23M8960MT/AA, RF22NPEDBSR/AA, RF22NPEDBSG/AA, RF23M8570SR/AA, RF23HCEDBSG/AA, RF22N9781SG/AA, RF23M8070SG/AA, RF23HCEDBWW/AA, DRF36C100SR/DA, RF23HTEDBSR/AA, RF23R6201SR/AA, RF23R6201SR/AZ, RF23R6201WW/AA, RF23R6201SG/AA, DRF36C100SR/DA

  1. Turn off power to the refrigerator at the circuit breaker or unplug the refrigerator to ensure complete power disconnection.
  2. Close the water supply valve to the refrigerator to prevent water leakage during the repair.
  3. Verify power is off by checking that the refrigerator lights and display are not functioning.
  4. Place towels or a shallow pan in the freezer compartment under the ice maker area to catch any residual water or ice that may fall during the repair.
  5. Take multiple photos of the ice maker assembly location, mounting, electrical connections, and water line connection before disassembly. Document from multiple angles. This is absolutely critical for proper reassembly. Use a camera or smartphone to capture high-quality images.
  6. Create a detailed connection map by photographing the electrical connector(s) and water inlet tube connection. Use masking tape to label each connection point.
  7. Open the freezer door fully to provide access to the ice maker assembly.
  8. Remove the ice storage bin by lifting it up and pulling it forward out of the freezer compartment. Set it aside in a safe location.
  9. Locate the ice maker assembly mounted on the left or right side wall of the freezer compartment (depending on your model).
  10. Take additional detailed photos of the ice maker mounting, electrical connector(s), water inlet tube connection, and shutoff arm position before disconnecting.
  11. Disconnect the electrical connector(s) from the ice maker assembly by pressing the locking tab and pulling the connector straight off. Do not pull on the wires—grasp the connector body. Label the connector with masking tape indicating its function.
  12. Verify the electrical connector is disconnected by attempting to gently move the ice maker assembly. The assembly should not be attached to any electrical connections.
  13. Disconnect the water inlet tube from the ice maker assembly by pressing the release collar and pulling the tube straight out, or by loosening the compression fitting with pliers (depending on your model). Be prepared for residual water to drain out—use towels to catch the water.
  14. Verify the water inlet tube is disconnected by attempting to gently move the ice maker assembly. The assembly should not be attached to the water line.
  15. Locate the ice maker mounting screws or clips that secure the assembly to the freezer wall (typically 2-4 mounting screws).
  16. Remove the mounting screws using a Phillips screwdriver or nut driver, or release the mounting clips by pressing the release tabs and lifting the assembly.
  17. Carefully remove the old ice maker assembly from the freezer and place it on a clean work surface with adequate space for inspection.
  18. Inspect the old ice maker assembly for visible damage such as a cracked ice mold, broken ejector blades, burned motor windings, corroded electrical connections, or damaged housing. This confirms the diagnosis.
  19. Inspect the water inlet tube and connection for damage, cracks, or mineral buildup. Clean or replace the tube if necessary.
  20. Inspect the mounting location on the freezer wall for damage, ice buildup, or debris. Clean the mounting area thoroughly with a dry cloth.
  21. Unpack the new DA97-18859A ice maker assembly from its packaging. Handle carefully to avoid damaging the ice mold, motor, or ejector blades.
  22. Verify the ice maker assembly specifications match the old assembly: dimensions approximately 10-13 inches x 4-6 inches x 6-8 inches, electrical connector type(s), water inlet tube connection type, mounting hole locations, shutoff arm position.
  23. Compare the new ice maker assembly to the old one to verify the dimensions, connector types, water inlet connection, mounting holes, and overall appearance match. Ensure you have the correct replacement part.
  24. Inspect the new ice maker assembly for any damage or defects before installation. The housing should be intact with no visible cracks, the ice mold should be smooth and undamaged, and the ejector blades should move freely.
  25. Position the new ice maker assembly on the freezer wall, aligning the mounting holes with the wall mounting points and orienting the water inlet tube connection toward the water supply line.
  26. Install the mounting screws to secure the ice maker assembly to the freezer wall, or engage the mounting clips by pressing the assembly into place until it clicks. Tighten screws gently but firmly—do not overtighten, which can crack the housing or strip the mounting points.
  27. Verify the ice maker assembly is securely mounted and does not wobble or shift when gently pressed.
  28. Reconnect the water inlet tube to the ice maker assembly by pushing the tube into the connection until it clicks into place, or by tightening the compression fitting with pliers. Ensure the connection is secure to prevent leaks.
  29. Verify the water inlet tube connection is secure by gently tugging on the tube. The tube should not pull out—it should be firmly seated in the connection.
  30. Reconnect the electrical connector(s) to the ice maker assembly by pushing the connector straight onto the assembly terminals until it clicks into place. Use your labeled connector and detailed photos to ensure correct placement.
  31. Verify the electrical connector is fully seated by gently tugging on the connector. The connector should not pull off—it should be firmly seated.
  32. Double-check all connections by comparing your installation to your detailed photos. Verify the electrical connector and water inlet tube are in the correct positions and fully secured.
  33. Position the shutoff arm (if equipped) in the down position to allow ice production to begin.
  34. Reinstall the ice storage bin by sliding it back into the freezer compartment until it is fully seated.
  35. Restore power at the circuit breaker or plug in the refrigerator.
  36. Open the water supply valve to the refrigerator.
  37. Wait 24 hours for the ice maker to complete its first ice production cycle. The ice maker requires time to reach proper freezing temperature and complete the full cycle.
  38. Monitor the ice maker during the first 24-48 hours to verify it fills with water, freezes the water, and ejects ice cubes into the storage bin.
  39. Inspect the water inlet connection for leaks during the first fill cycle. There should be no water leaking from the connection.
  40. Verify ice production by checking the ice storage bin after 24 hours. The bin should contain freshly made ice cubes.
  41. Test multiple ice production cycles over 48-72 hours to verify the ice maker operates properly and produces ice consistently.
  42. Monitor the refrigerator for one week to ensure the ice maker operates properly without issues or leaks.

Safety Notes: Always turn off power and close the water supply valve before working on the refrigerator to prevent electrical shock and water leakage. Be prepared for residual water to drain out when disconnecting the water inlet tube—use towels to catch the water. Handle mechanical components carefully to avoid damaging the ice mold, motor, or ejector blades. Ensure the water inlet tube connection is fully secured to prevent leaks. This repair requires moderately advanced mechanical skills and careful attention to detail—most homeowners can complete this repair successfully with proper precautions and documentation.

  1. Document the ice maker assembly location, connections, and shutoff arm position with detailed photos before disconnecting. Take high-quality photos of the assembly mounting, electrical connector(s), water inlet tube connection, and shutoff arm position from multiple angles. This documentation is critical for ensuring correct reinstallation and avoiding mistakes.
  2. Verify the water supply is functioning properly before replacing the ice maker. Test the water inlet valve by manually activating it (if possible) or by checking water flow to the ice maker location. If no water flows, the problem may be the water inlet valve, water filter, or household water supply rather than the ice maker assembly. Replace the water inlet valve or water filter if necessary before replacing the ice maker.
  3. Allow 24 hours for the ice maker to complete its first ice production cycle after installation. The ice maker requires time to reach proper freezing temperature (0°F/-18°C) and complete the full freeze-harvest cycle. Do not expect immediate ice production. The first batch of ice cubes may take 12-24 hours to appear in the storage bin.
  4. Inspect the water inlet tube connection for leaks immediately after restoring power and water supply. Monitor the connection during the first fill cycle (typically 6-8 seconds). Water should flow into the ice mold without leaking from the connection. If leaking occurs, turn off the water supply, disconnect the tube, and reconnect it firmly.
  5. The ice maker shutoff arm (if equipped) is a critical safety feature that stops ice production when the storage bin is full. Verify the shutoff arm moves freely and is positioned correctly. If the shutoff arm is stuck or broken, the ice maker will either not produce ice or will overflow the storage bin. Replace the shutoff arm if it is damaged.
  6. Monitor ice production over the first 48-72 hours to verify proper operation. The ice maker should produce ice cubes consistently and eject them into the storage bin. Ice cubes should be solid and uniform in size. Hollow or malformed ice cubes indicate water fill problems or freezing problems.
  7. Clean the ice storage bin and remove any old ice before installing the new ice maker. Old ice may contain bacteria or contaminants. Empty the bin completely and wash it with warm soapy water before reinstalling it. This ensures clean ice production from the new ice maker.
  8. The ice maker electrical connector is typically a simple push-on connector. Do not force the connector onto the assembly terminals. The connector should insert smoothly with moderate pressure. If the connector does not insert smoothly, verify the connector orientation is correct.
  9. Some ice maker models have a water inlet tube with a quick-disconnect fitting, while others use a compression fitting. Verify your model's connection type before disconnecting the old ice maker. Quick-disconnect fittings press in and pull straight out, while compression fittings require a wrench to loosen. Using the wrong technique may damage the fitting.
  10. This repair is cost-effective compared to refrigerator replacement. The cost of ice maker assembly replacement ($80-150) is far less than the cost of a new refrigerator ($1,500-4,000+). Replace the ice maker assembly promptly when failure is detected to prevent the need for expensive refrigerator replacement and to restore automatic ice production.


Whirlpool refrigerator replacement parts, Frigidaire refrigerator replacement parts, GE refrigerator replacement parts, Kenmore refrigerator replacement parts, KitchenAid refrigerator replacement parts, LG refrigerator replacement parts, Maytag refrigerator replacement parts, Whirlpool refrigerator drawers and glides replacement, Whirlpool dishwasher replacement parts, GE dishwasher replacement parts, KitchenAid dishwasher replacement parts, Maytag dishwasher replacement parts, Frigidaire dishwasher replacement parts, Kenmore dishwasher replacement parts, Whirlpool washer replacement parts, GE washer replacement parts, Maytag washer replacement parts, Kenmore washer replacement parts, LG washer replacement parts, Whirlpool dryer replacement parts, GE dryer replacement parts, Maytag dryer replacement parts, Kenmore dryer replacement parts, LG dryer replacement parts, Whirlpool range replacement parts, GE range replacement parts, Whirlpool stove replacement parts, GE stove replacement parts, GE oven replacement parts, GE microwave replacement parts, buy Whirlpool refrigerator parts online, buy GE dishwasher parts online, replacement Kenmore washer parts for sale, buy Maytag dryer parts, LG washer replacement parts online, KitchenAid refrigerator parts for sale, Whirlpool stove and range replacement parts

DA97-18859A Samsung Refrigerator Ice Maker Assembly – Complete Automatic Ice Production System

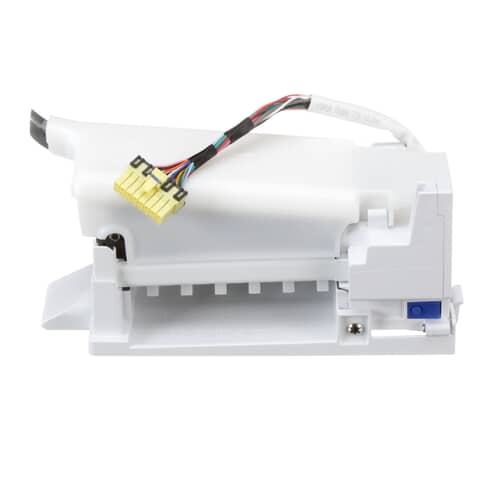
The DA97-18859A is a genuine OEM refrigerator ice maker assembly for Samsung and Dacor refrigerators. This ice maker assembly is the complete automatic ice production system that freezes water into ice cubes, harvests the ice cubes from the mold, and ejects them into the ice storage bin.

✓ Key Features & Design

  • Genuine OEM replacement part for Samsung and Dacor refrigerators
  • Complete ice maker assembly with ice mold, motor, heating element, and thermostat
  • Durable plastic housing with aluminum ice mold
  • Operates on 120 volts AC, 60 Hz
  • Replaces DA97-13718C, DA97-13718A, DA97-13718B, DA97-15217D, DA97-08259A

✓ Performance & Benefits

The ice maker operates through a fully automatic cycle: water fills the ice mold through the water inlet tube, the thermostat monitors the ice mold temperature and waits for the water to freeze completely (typically 90-120 minutes), when the ice is fully frozen the thermostat signals the motor to begin the harvest cycle, the heating element activates briefly to slightly warm the bottom of the ice mold loosening the ice cubes, the motor rotates the ejector blades which push the ice cubes out of the mold and into the ice storage bin, and the cycle repeats automatically until the ice bin is full.

✓ Common Symptoms

This ice maker assembly fixes: ice maker not producing ice at all, ice maker producing ice slowly or incompletely, ice maker not ejecting ice cubes (ice stuck in mold), ice maker leaking water, ice maker making unusual grinding or clicking sounds, ice cubes being malformed or hollow, ice maker cycling continuously without producing ice, ice maker not filling with water.

✓ Replacement Part Numbers

Part number DA97-18859A replaces: DA97-13718C, DA97-13718A, DA97-13718B, DA97-15217D, DA97-08259A

✓ Compatible Models

This ice maker assembly fits Samsung and Dacor refrigerator models including RF23, RF22, RF24, and DRF36 series. Check the product tags for your specific model number, or contact our expert support team for fit verification assistance.

✓ Installation Notes

Important: Always turn off power and close the water supply valve before working on the refrigerator. This is a moderately advanced repair requiring careful handling of electrical connections and water line connections. Verify your refrigerator model number before ordering. Test the water supply and water inlet valve before replacing the ice maker.

✓ Trust Signals

With over 30 years of experience serving Canadian customers, XPart Supply Ltd. provides expert phone support and guaranteed fit assistance. We're a trusted Canadian business committed to helping you get the right part the first time.

✓ Frequently Asked Questions

Q: How do I know if this ice maker fits my refrigerator model?
A: Check the tags on this product page for your specific model number, or contact our expert support team for fit verification assistance.

Q: Is this an OEM or aftermarket part?
A: This is a genuine OEM replacement part that meets or exceeds original manufacturer specifications.

Q: How difficult is installation?
A: This is a moderate repair requiring basic mechanical skills. Always turn off power and water before working on your refrigerator. We recommend consulting your refrigerator's service manual or contacting our support team for guidance.

Cross Reference Information

Ice Maker Assembly, Ice Maker Module, Ice Maker Unit, Automatic Ice Maker, Ice Production System, Ice Harvesting Assembly

Samsung, Dacor

Part number DA97-18859A replaces DA97-13718C, DA97-13718A, DA97-13718B, DA97-15217D, DA97-08259A, DA97-18859A, AP6329377, PS12074067, EAP12074067, 4809480

Guaranteed to Fit Your Model

RF23HCEDBSR/AA, RF22M9581SG/AA, RF22M9581SR/AA, RF24FSEDBSR/AA, RF22KREDBSG/AA, RF22KREDBSR/AA, RF23HCEDBBC/AA, RF22K9381SG/AA, RF23J9011SR/AA, RF23J9011SG/AA, RF22K9381SR/AA, RF23M8590SR/AA, RF24J9960S4/AA, RF23M8070SR/AA, RF23M8090SG/AA, RF23M8090SR/AA, RF23M8590SG/AA, RF23M8570SG/AA, RF23M8960S4/AA, RF22N9781SR/AA, RF23M8960MT/AA, RF22NPEDBSR/AA, RF22NPEDBSG/AA, RF23M8570SR/AA, RF23HCEDBSG/AA, RF22N9781SG/AA, RF23M8070SG/AA, RF23HCEDBWW/AA, DRF36C100SR/DA, RF23HTEDBSR/AA, RF23R6201SR/AA, RF23R6201SR/AZ, RF23R6201WW/AA, RF23R6201SG/AA, DRF36C100SR/DA

Frequently Asked Questions


Not sure about your model number? Call 1-877-899-7278 and we’ll help you confirm. All brand names are the property of their respective owners and are used for compatibility reference only.

BUILT TOUGH · PARTS THAT LAST · GUARANTEED

Trusted Family Business

30 years of Excellence in Appliance Parts

Whether you need a refrigerator water filter, a replacement burner for your stove, or a dryer belt, XPart Supply has you covered. We carry a wide selection of appliance parts in Kitchener-Waterloo for all major brands, including washers, dryers, refrigerators, dishwashers, ovens, and more.

We also offer used appliances and scratch-and-dent appliances in Kitchener-Waterloo, providing affordable, reliable options for customers looking to save money without sacrificing performance. Every appliance is inspected and tested for quality.

For over 30 years, our family-owned business has proudly served the community with quality appliance parts and exceptional service. What started as a small local shop has grown into a trusted name — but we’ve never forgotten our roots. Every customer receives the personal attention and care that only a family-owned business can provide.

When you need appliance parts, used appliances, or scratch-and-dent appliances in Kitchener-Waterloo, trust XPart Supply — Built Tough. Parts That Last.

Years of Experience

Our knowledge has been built over the past 30 years in the business, ensuring expert advice for every appliance need.

Personal Service Guarantee

We treat every customer like family, providing personalized solutions and standing behind our products.

Built on Trust

Our reputation has been built one satisfied customer at a time, creating lasting relationships in our community.

Buy Online Pick Up In-Store

Address
101 Trillium Dr
Kitchener, Ontario N2E 1W8
Hours
Mon–Fri 9 AM–5 PM • Sat 9 AM–1 PM
Get Directions