W10915031 Range Control Panel

W10915031 Range Control Panel

Sale price
$696.42
Regular price
$835.70
You save
$139.28 (17%)

XPart Number: 10008489197857   |   GTIN: 77570849

Frequently Bought Together

Guaranteed to fit your model: Need help? Call 833-899-7278

Shipper / Seller: XPart Supply Ltd.

Professional: 30-45 minutes
DIY: 60-90 minutes
Difficulty Level: Medium repair (requires careful disassembly and connector handling)

  • Control panel display is blank or dim
  • Touchpad buttons don't respond or work intermittently
  • Display shows error codes
  • Some buttons work, others don't
  • Cracked, peeling, or damaged control panel overlay
  • Display shows incorrect information or random characters
  • Oven won't accept temperature or mode selections
  • Timer and clock functions don't work
  • Control panel lights up but oven won't heat
  • Buttons require excessive pressure to activate
  • Display flickers or fades in and out
  • Control panel makes beeping sounds without button presses
  • Visible damage to touchpad or display
  • Moisture or liquid damage to control panel
  • Control panel worked intermittently before failing completely
  • Oven functions work but display doesn't show information

W10854724, W10854710, W10854706, W10854703, W10854699, W10854695, PS11755914, AP6022465, 8507P015-60

Fits Models: (Ctrl+F and Enter Your Model Number)

Whirlpool: WFE550S0LZ0, WFE550S0LV0, WFE550S0LB0, WFE550S0HZ0, WFE550S0HV0, WFE550S0HB0, WFE525S0JZ0, WFE525S0JV0, WFE525S0JB0, WFE540H0EZ0

KitchenAid: KFEG500ESS0, KFEG500EWH0, KFEG500EBL0, KFEG500EBS0, KFES530ESS0, KFES530EWH0, KFES530EBL0, KFES530EBS0, KFGG500ESS0, KFGD500ESS0

Maytag: MGR8800FZ0, MGR8800FW0, MGR8800FB0, MER8800FZ0, MER8800FW0, MER8800FB0, MER6600FZ0, MER6600FW0, MER6600FB0, MGR6600FZ0

Jenn-Air: JGS1450DS01, JGS1450DP01, JGS1450DB01, JES1450DS01, JES1450DP01, JES1450DB01, JGR8430ADS, JGR8430ADP, JGR8430ADB, JER8430ADS

Amana: AGR6603SFW0, AGR6603SFB0, AGR6603SFS0, AER6603SFW0, AER6603SFB0, AER6603SFS0, AGR5330BAS0, AGR5330BAW0, AGR5330BAB0, AER5330BAS0Note: This is a partial list. This control panel is used in many Whirlpool-manufactured ranges built between 2015-2024. Verify your specific model number for compatibility before ordering. Control panels are model-specific—using an incorrect panel will cause malfunction or won't fit properly.

Required Tools:

  • Phillips screwdriver
  • Flathead screwdriver
  • 1/4" nut driver
  • Needle-nose pliers
  • Putty knife or trim removal tool
  • Camera or smartphone (for reference photos)
  • Work gloves
  • Towel or blanket (to protect range surface)

Step-by-Step Installation:

  1. Disconnect Power: Turn off the circuit breaker to the range or unplug it from the electrical outlet. For dual-fuel ranges, also shut off the gas supply valve. Never work on the range with power connected.
  2. Allow Range to Cool: If the range was recently used, wait at least 2 hours for it to cool completely before beginning work.
  3. Open Oven Door: Open the oven door fully to provide access to the control panel mounting area and prevent damage during disassembly.
  4. Remove Control Panel Trim (if applicable): Some models have a decorative trim piece or end caps on either side of the control panel. Use a putty knife or trim removal tool to carefully pry off any trim pieces. Set them aside.
  5. Locate Mounting Screws: The control panel is typically secured with screws located at the top rear of the control panel (accessible from above) or behind the front panel edge. Look for 2-6 screws along the top or sides of the control panel.
  6. Remove Mounting Screws: Remove all screws securing the control panel to the range cabinet. Keep these screws—you'll need them for reinstallation.
  7. Release Panel Clips: Many control panels also have spring clips or locking tabs along the bottom or sides. Carefully insert a putty knife or flathead screwdriver between the control panel and range front to release these clips. Work gently to avoid breaking the clips.
  8. Tilt Panel Forward: Once screws and clips are released, carefully tilt the control panel forward and down, away from the range. Support the panel—don't let it hang by the wire harness.
  9. Access Wire Harness: With the control panel tilted forward, you'll see the wire harness connector(s) on the back of the panel connecting it to the main control board inside the range.
  10. Document Wire Connection: IMPORTANT: Take a clear photo of the wire harness connector showing its position, orientation, and color coding. Some models have multiple connectors—photograph each one.
  11. Disconnect Wire Harness: Press the release tab on the wire harness connector and carefully pull straight off the control panel. Some connectors may be tight—gently wiggle while pulling. Do not pull on the wires themselves, only the connector housing. If there are multiple connectors, disconnect all of them and label each one.
  12. Remove Old Control Panel: Once the wire harness is disconnected, lift the old control panel completely away from the range. Set it aside on a protected surface.
  13. Inspect for Damage: Examine the old control panel for visible damage: cracked touchpad, peeling overlay, burned connectors, or melted plastic. This helps confirm the diagnosis and identify the cause of failure.
  14. Prepare New Control Panel: Remove the new control panel assembly from its protective packaging. Verify it matches the old panel in size, button layout, and connector configuration. Handle carefully—avoid touching the display screen or touchpad surface.
  15. Connect Wire Harness: Using your reference photo, plug the wire harness connector(s) into the back of the new control panel. Push each connector straight onto the panel until you hear or feel a click. Verify each connector is fully seated and locked. Ensure no wires are pinched or stressed.
  16. Position New Control Panel: Carefully position the new control panel into the mounting location on the range front. Align the bottom edge first, then tilt the panel up into position.
  17. Engage Panel Clips: Press firmly on the control panel to engage any spring clips or locking tabs along the bottom or sides. You should hear or feel the clips snap into place.
  18. Install Mounting Screws: Insert and tighten all mounting screws to secure the control panel. Tighten firmly but do not overtighten—excessive force can crack the plastic panel housing.
  19. Reinstall Trim Pieces: If you removed any decorative trim or end caps, snap them back into position on either side of the control panel.
  20. Close Oven Door: Close the oven door carefully.
  21. Restore Power: Turn on the circuit breaker or plug the range back in. For dual-fuel ranges, turn the gas supply back on.
  22. Test Control Panel: The display should light up within a few seconds. Press various buttons to verify all touchpad functions respond correctly. Test temperature up/down buttons, oven mode selections, timer functions, and any other controls.
  23. Test Oven Operation: Set the oven to BAKE mode at 350°F and verify the oven heats properly. The display should show the set temperature and current temperature as it preheats. Cancel the cycle after verifying proper operation.
  24. Test All Functions: Test all oven modes (Bake, Broil, Convection, Self-Clean, etc.), clock/timer functions, and any special features (Delay Start, Sabbath Mode, etc.) to ensure the new control panel operates correctly.
  25. Check for Error Codes: Monitor the display for any error codes during the first 24 hours of operation. If error codes appear, verify all wire connections are secure.

Distinguish between control panel and control board failures. The control panel (touchpad and display) is separate from the main control board (EOC) that actually controls oven functions. If your display is blank or buttons don't respond, the control panel is likely faulty. If the display works fine but the oven won't heat, won't reach temperature, or displays error codes related to heating elements or sensors, the main control board is likely the problem, not the control panel. Misdiagnosing which component failed wastes money—test systematically before ordering parts.

Test the control panel ribbon cable connection. Many "control panel failures" are actually just loose or corroded ribbon cable connections between the touchpad and the main control board. Before replacing a $150+ control panel, disconnect and reconnect the wire harness connector. Clean the connector pins with electrical contact cleaner and inspect for corrosion, bent pins, or damage. A poor connection causes intermittent button response, blank displays, or erratic behavior. Sometimes cleaning and reseating the connector solves the problem without replacing anything.

Moisture and grease damage control panels permanently. Control panels are not waterproof. Cooking steam, boil-overs, and cleaning spray that seeps behind the panel causes corrosion on circuit traces and touchpad contacts. Even after drying, corroded components will fail. When replacing a control panel due to moisture damage, also improve your cleaning practices—never spray cleaners directly on the control panel. Spray onto a cloth first, then wipe. Otherwise your new panel will fail the same way within months.

Control panel overlays are not separately replaceable. The control panel overlay (the graphic panel with button labels and display window) is permanently bonded to the touchpad assembly. If your overlay is cracked, peeling, or faded, you must replace the entire control panel assembly—the overlay cannot be purchased or replaced separately. Attempting to remove or replace just the overlay will damage the touchpad membrane underneath and make the problem worse.

Static electricity damages control panels instantly. Always discharge static electricity before handling the new control panel. Touch a grounded metal surface (range frame, water pipe) before touching the panel. Never work on carpet or in low-humidity conditions. Keep the new panel in its protective packaging until you're ready to install it. One static discharge can destroy sensitive touchpad circuits and render the panel useless before you even install it.

Connector orientation matters—don't force it. The wire harness connector is keyed and can only connect one way. If the connector doesn't slide on easily, don't force it—you have it upside down or misaligned. Forcing a connector on incorrectly bends pins, damages the connector housing, and can destroy the new control panel when power is applied. Always compare your installation to your reference photo and ensure the connector alignment tab matches the socket.

Control panel and control board must be compatible. Control panels are programmed to work with specific control board versions. Using a control panel from a different model series—even if it physically fits—will cause communication errors, incorrect displays, or non-functional buttons. Always verify the replacement panel is specifically listed for your exact model number. When in doubt, contact the manufacturer or a parts specialist to confirm compatibility before ordering.


Whirlpool refrigerator replacement parts, Frigidaire refrigerator replacement parts, GE refrigerator replacement parts, Kenmore refrigerator replacement parts, KitchenAid refrigerator replacement parts, LG refrigerator replacement parts, Maytag refrigerator replacement parts, Whirlpool refrigerator drawers and glides replacement, Whirlpool dishwasher replacement parts, GE dishwasher replacement parts, KitchenAid dishwasher replacement parts, Maytag dishwasher replacement parts, Frigidaire dishwasher replacement parts, Kenmore dishwasher replacement parts, Whirlpool washer replacement parts, GE washer replacement parts, Maytag washer replacement parts, Kenmore washer replacement parts, LG washer replacement parts, Whirlpool dryer replacement parts, GE dryer replacement parts, Maytag dryer replacement parts, Kenmore dryer replacement parts, LG dryer replacement parts, Whirlpool range replacement parts, GE range replacement parts, Whirlpool stove replacement parts, GE stove replacement parts, GE oven replacement parts, GE microwave replacement parts, buy Whirlpool refrigerator parts online, buy GE dishwasher parts online, replacement Kenmore washer parts for sale, buy Maytag dryer parts, LG washer replacement parts online, KitchenAid refrigerator parts for sale, Whirlpool stove and range replacement parts

W10915031 Range Control Panel

Discover the W10915031 Range Control Panel, a reliable replacement part engineered for precise operation of your kitchen appliances. Ideal for DIY enthusiasts and professional technicians, this component ensures seamless functionality and compatibility with select models, making maintenance straightforward and effective.

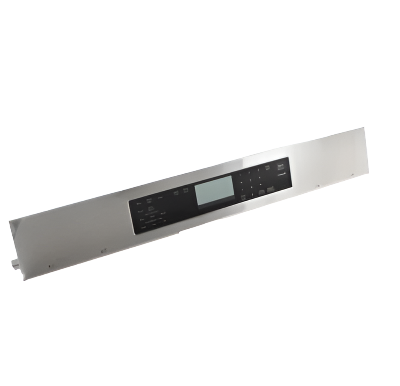
Key Features and Design

Crafted by XPart Supply Ltd., renowned for quality replacement parts, the W10915031 features durable construction that meets exact specifications for long-lasting performance. This control panel is designed to integrate smoothly with supported models like KSDG950ESS0 and its variants, replacing older parts such as W10697329 or W10901117 to restore optimal appliance operation.

  • Durable materials: Built to withstand regular use, ensuring reliability in your kitchen environment.
  • Precise engineering: Offers accurate control for enhanced appliance efficiency and ease of installation.

Performance and Benefits

This control panel solves common issues with faulty appliance controls, providing extended service life and dependable performance that enhances your daily routines. By restoring precise functionality, it helps maintain the efficiency of your kitchen setup, saving time and reducing the need for costly repairs, while offering peace of mind for homeowners seeking genuine Whirlpool-compatible parts.

The W10915031 PANEL-CNTRL is an essential control panel component designed for precise appliance operation. Engineered to exact specifications, this replacement part ensures seamless integration with compatible systems. Its durable construction guarantees reliable performance and extended service life, making it the preferred choice for professional technicians and DIY enthusiasts seeking quality replacement components.

Part Number W10915031 replaces W10697329, W10901117

Supported Models:

KSDG950ESS0, KSDG950ESS1, KSDG950ESS2, KSDG950ESS3, KSDG950ESS3, KSDG950ESS6, KSDG950ESS6, KSDG950ESS7, YKSDG950ESS0

Cross Reference Information

W10854724, W10854710, W10854706, W10854703, W10854699, W10854695, PS11755914, AP6022465, 8507P015-60

Guaranteed to Fit Your Model

Whirlpool: WFE550S0LZ0, WFE550S0LV0, WFE550S0LB0, WFE550S0HZ0, WFE550S0HV0, WFE550S0HB0, WFE525S0JZ0, WFE525S0JV0, WFE525S0JB0, WFE540H0EZ0

KitchenAid: KFEG500ESS0, KFEG500EWH0, KFEG500EBL0, KFEG500EBS0, KFES530ESS0, KFES530EWH0, KFES530EBL0, KFES530EBS0, KFGG500ESS0, KFGD500ESS0

Maytag: MGR8800FZ0, MGR8800FW0, MGR8800FB0, MER8800FZ0, MER8800FW0, MER8800FB0, MER6600FZ0, MER6600FW0, MER6600FB0, MGR6600FZ0

Jenn-Air: JGS1450DS01, JGS1450DP01, JGS1450DB01, JES1450DS01, JES1450DP01, JES1450DB01, JGR8430ADS, JGR8430ADP, JGR8430ADB, JER8430ADS

Amana: AGR6603SFW0, AGR6603SFB0, AGR6603SFS0, AER6603SFW0, AER6603SFB0, AER6603SFS0, AGR5330BAS0, AGR5330BAW0, AGR5330BAB0, AER5330BAS0Note: This is a partial list. This control panel is used in many Whirlpool-manufactured ranges built between 2015-2024. Verify your specific model number for compatibility before ordering. Control panels are model-specific—using an incorrect panel will cause malfunction or won't fit properly.

Frequently Asked Questions


Not sure about your model number? Call 833-899-7278 and we’ll help you confirm. All brand names are the property of their respective owners and are used for compatibility reference only.

BUILT TOUGH · PARTS THAT LAST · GUARANTEED

Trusted Family Business

30 years of Excellence in Appliance Parts

Whether you need a refrigerator water filter, a replacement burner for your stove, or a dryer belt, XPart Supply has you covered. We carry a wide selection of appliance parts in Kitchener-Waterloo for all major brands, including washers, dryers, refrigerators, dishwashers, ovens, and more.

We also offer used appliances and scratch-and-dent appliances in Kitchener-Waterloo, providing affordable, reliable options for customers looking to save money without sacrificing performance. Every appliance is inspected and tested for quality.

For over 30 years, our family-owned business has proudly served the community with quality appliance parts and exceptional service. What started as a small local shop has grown into a trusted name — but we’ve never forgotten our roots. Every customer receives the personal attention and care that only a family-owned business can provide.

When you need appliance parts, used appliances, or scratch-and-dent appliances in Kitchener-Waterloo, trust XPart Supply — Built Tough. Parts That Last.

Years of Experience

Our knowledge has been built over the past 30 years in the business, ensuring expert advice for every appliance need.

Personal Service Guarantee

We treat every customer like family, providing personalized solutions and standing behind our products.

Built on Trust

Our reputation has been built one satisfied customer at a time, creating lasting relationships in our community.

Buy Online Pick Up In-Store

Address
101 Trillium Dr
Kitchener, Ontario N2E 1W8
Phone
Hours
Mon–Fri 9 AM–5 PM • Sat 9 AM–1 PM
Get Directions