


Washer Won’t Start or Showing Error Codes? Control Board W11633362 – Fix No-Start & Stuck Cycles Fast
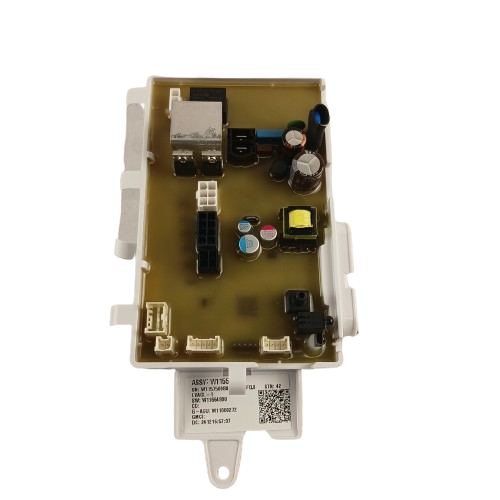
A failed electronic control board is the most common cause of a Whirlpool top-load washer that won’t start, displays persistent error codes, or gets stuck mid-cycle. In most Whirlpool, Maytag, and Amana top-load washers, the electronic control board (ACU assembly) is the central brain that manages every wash function — fill, agitation, spin, drain, and lid lock sequencing. When it fails, the washer may refuse to start, display error codes, run erratically, or stop responding to control panel inputs entirely. ⚡ Common failure point in Whirlpool MVW6500 and MVW7230 series top-load washers. Part W11633362 is the genuine OEM electronic control board that restores full washer operation, clears error codes, and returns all wash functions to factory performance.
❓ Is This the Right Part?
This is the correct fix if ALL of the following are true:
- ✔ Washer has power — display lights up or error codes are visible
- ✔ Lid lock, water inlet valve, and motor have been tested and confirmed functional
- ✔ Error codes point to a control board or communication fault
- ✔ ONLY problem is washer not starting, stuck cycle, or unresponsive control panel
Not sure? Send us your model number — we'll confirm before you order.
🔧 Common Symptoms
- Washer won’t start — no response when cycle is selected and Start is pressed
- Persistent error codes that don’t clear after power cycling
- Washer fills with water but won’t agitate or spin
- Control panel buttons are unresponsive or behave erratically
✔ If these symptoms match, this is the most likely failed component in the control system.
✔ In most cases, replacing this electronic control board restores full washer operation immediately.
📦 Part Details
- Part Number: W11633362
- Type: Washer Electronic Control Board (ACU Assembly / Main Control Board) — manages all wash cycle functions including fill, agitation, spin, drain, and lid lock
- Replaces: W11553774
- Brands: Whirlpool, Maytag, Amana, Kenmore, KitchenAid
Before replacing the control board, test the lid lock assembly for continuity. A faulty lid lock sends a false signal to the control board and is frequently misdiagnosed as a board failure — confirming the lid lock is functional before installing the new board eliminates the most common cause of repeat no-start issues.
⚙️ Installation
Skill Level: Moderate-Advanced — 60–90 minutes. Disconnect power and turn off the water supply before servicing. Remove the washer top panel and cabinet to access the control board housing. Photograph all wiring harness connections before disconnecting, transfer each connector to the new W11633362 board, and secure the board to the mounting bracket. Restore power and run a diagnostic cycle to confirm all functions are restored.
✓ Compatible Models
Confirmed compatible with MVW6500MW0, MVW6500MBK0, MVW6500MW1, MVW6500MBK1, MVW6500MW2, MVW6500MBK2, MVW6230HW0, MVW6230HC0, MVW6230RHW, MVW6230RHC, MVW7230HW0, MVW7230HC0, MVW7230RHW, MVW7230RHC plus additional Whirlpool and Maytag top-load models. Contact us to verify your model number before ordering.
💡 Pro Tip
The W11633362 has multiple wiring harness connectors that look similar. Before pulling any connector, photograph the board from multiple angles and label each harness with tape. A misrouted connector after installation will cause the same error codes you started with — and tracking it down costs more time than the original repair.
✓ Model-Specific Repair Pages
✅Compatibility & Cross Reference
Not sure about your model number? Call 1-877-899-7278 and we’ll help you confirm. All brand names are the property of their respective owners and are used for compatibility reference only.
Buy Online Pick Up In-Store
Kitchener, Ontario N2E 1W8


- Choosing a selection results in a full page refresh.

