



NO WATER ENTERING WASHER (WASHER WON'T FILL)
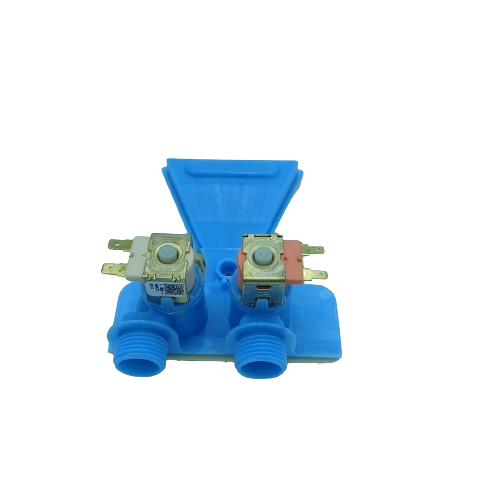
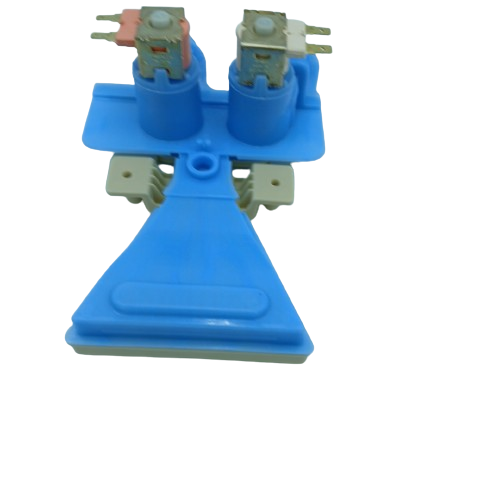
GE Washer VALVE DOUBLE WATER WW01F01774, Fixes No water entering washer (washer won't fill)
Genuine GE dual washer water-inlet valve assembly that controls hot- and cold-water flow into the washer.
Part WW01F01774Replaces 290D1316G005, 290D1316G010GE
Guaranteed to Fit — or your money back.
Confirm your full appliance model number before ordering.
Confirm your full appliance model number before ordering.
Is This the Right Part?
Part NumberWW01F01774
Replaces290D1316G005, 290D1316G010
ManufacturerGE
Appliance TypeWasher
Part TypeVALVE DOUBLE WATER
✅ Cross Reference Information
Current Part NumberWW01F01774
Replaces290D1316G005, 290D1316G010
Common Symptoms
- No water entering washer (washer won't fill)
- Washer fills very slowly
- Only hot water or only cold water fills (not both)
- Water continuously flows into washer (won't shut off)
- Water leaks from inlet valve body
- Water leaks from supply hose connections
- Washer overfills (water level too high)
- Washer doesn't advance past fill cycle
- Washer displays fill error codes
- Intermittent fill problems (works sometimes, not others)
- Low water pressure during fill
- Washer takes too long to fill
- Water temperature incorrect (cold when should be hot, etc.)
- Visible damage to valve body or solenoids
- Inlet valve makes buzzing or humming noise but doesn't fill
- Mineral deposits or corrosion on valve
Check Before Replacing
- Confirm both hot and cold supply taps behind the washer are fully open
- Inspect and clean the mesh inlet screens on the valve — sediment buildup is a common cause of restricted flow
- Check for kinked or damaged inlet hoses
- Verify household water pressure is adequate (typically 20–120 PSI)
- Inspect wiring and electrical connectors to the valve solenoids for damage
- Test the thermistor and pressure-sensing system before replacing the valve
- Check the electronic control for fault codes before assuming valve failure
Pro Tip
Clean the inlet screens before replacing the valve.
Part Details
Part NumberWW01F01774
Part TypeVALVE DOUBLE WATER
ManufacturerGE
Appliance TypeWasher
Installation Notes
- Required Tools:
- Phillips screwdriver
- Flathead screwdriver
- 1/4" or 5/16" nut driver
- Adjustable pliers or channel locks
- Needle-nose pliers
- Towels (to soak up water)
- Bucket or shallow pan (to catch water)
- Work gloves
- Flashlight
- Camera or smartphone (for reference photos)
- Step-by-Step Installation:
- Disconnect Power:
- Unplug the washer from the electrical outlet or turn off the circuit breaker. Never work on the washer with power connected.
- Shut Off Water Supply:
- Turn off both hot and cold water supply valves behind the washer. Turn the valves clockwise until fully closed. This is a critical safety step.
- Move Washer:
- Pull the washer away from the wall to provide access to the rear panel. You'll need at least 3 feet of clearance.
- Place Towels:
- Place towels on the floor behind the washer to catch water that will drain from the supply hoses and valve when disconnected.
- Disconnect Water Supply Hoses:
- Using adjustable pliers or channel locks, loosen the hot and cold water supply hoses from the inlet valve. Turn counterclockwise to loosen. Water will drain from the hoses—have towels ready. Once loosened, unscrew the hoses by hand and set them aside.
- Inspect Inlet Screens:
- With the supply hoses disconnected, look into the inlet ports on the valve. You'll see small mesh screens. Inspect these screens for debris, sediment, or mineral buildup. Clean or replace screens if clogged—this is a common cause of slow fill or no fill issues.
- Remove Rear Access Panel (if necessary):
- Some models require removing the rear access panel to access the valve mounting hardware. Remove screws securing the rear panel (typically 4-8 screws around the perimeter). Lift the panel off and set it aside.
- Locate Water Inlet Valve:
- The water inlet valve is mounted at the top rear of the washer where the supply hoses connect. It's a rectangular component with two inlet ports (hot and cold) and one or more outlet ports.
- Take Reference Photos:
- Before disconnecting anything, take clear photos of the inlet valve showing all wire harness connections, hose connections, and mounting orientation.
- Disconnect Internal Hoses:
- The inlet valve has internal hoses that route water from the valve to the tub or dispenser. Use pliers to release the hose clamps (spring clamps or screw clamps) on each outlet port. Slide the clamps away from the connection points. Pull the hoses off the valve outlet ports. Water will drain out—have towels ready.
- Disconnect Wire Harnesses:
- The inlet valve has wire harness connectors for each solenoid (typically 2 connectors, one for hot and one for cold). Press the release tabs and carefully pull the connectors straight off the valve terminals. Do not pull on the wires themselves, only the connector housings.
- Remove Mounting Hardware:
- The inlet valve is secured to the washer frame with mounting screws or clips (typically 2-4 fasteners). Remove all mounting screws. Keep these screws—you'll need them for reinstallation.
- Remove Old Valve:
- Once all connections and mounting hardware are removed, carefully lift the old inlet valve away from the mounting location. Maneuver it out from behind the washer.
- Inspect Old Valve:
- Examine the old valve for visible damage: cracks in the valve body, mineral deposits, corroded solenoid coils, or damaged inlet/outlet ports. Check the inlet screens for debris. This helps confirm the diagnosis and identify the cause of failure.
- Clean Mounting Area:
- Wipe down the valve mounting area on the washer frame. Remove any mineral deposits, rust, or debris. A clean mounting surface ensures proper valve alignment and operation.
- Prepare New Valve:
- Remove the new water inlet valve from its packaging. Verify it matches the old valve in size, inlet/outlet port configuration, mounting hole positions, and wire connector types. Handle carefully—avoid dropping or impacting the valve.
- Inspect New Valve Screens:
- Check the inlet screens on the new valve to ensure they're clean and properly seated. These screens prevent debris from entering the valve and causing failure.
- Position New Valve:
- Carefully position the new inlet valve into the mounting location at the top rear of the washer. Align the mounting holes with the washer frame mounting points. Ensure the inlet ports face outward (toward the rear of the washer) for easy hose connection.
- Install Mounting Hardware:
- Secure the valve with mounting screws or clips. Tighten screws firmly but do not overtighten—excessive force can crack the plastic valve body or strip the mounting holes.
- Reconnect Internal Hoses:
- Push the internal hoses firmly onto the valve outlet ports. The hoses should slide on at least 1-2 inches. Ensure they're fully seated.
- Secure Internal Hoses:
- Slide the hose clamps over the hoses at the outlet connection points. Position the clamps 1/4 to 1/2 inch from the hose ends. Tighten or squeeze the clamps securely. The hoses should not pull off when tugged.
- Reconnect Wire Harnesses:
- Plug the wire harness connectors back onto the inlet valve solenoid terminals. Push each connector straight on until you hear or feel a click. Verify the connections are fully seated and locked. Typically, one connector is for the hot water solenoid and one is for the cold water solenoid—they're usually interchangeable, but verify with your photos.
- Verify All Connections:
- Compare your installation to your reference photos. Ensure all internal hoses are connected, clamps are secure, and wire connectors are attached.
- Reinstall Rear Access Panel (if removed):
- Position the rear access panel back onto the washer. Secure with all mounting screws around the perimeter.
- Reconnect Water Supply Hoses:
- Thread the hot and cold water supply hoses onto the inlet valve inlet ports. Hand-tighten first to ensure proper threading. The hot water hose typically connects to the left port (when facing the rear of the washer), and cold water to the right port—verify with markings on the valve (H and C).
- Tighten Supply Hoses:
- Using adjustable pliers or channel locks, tighten the supply hose connections an additional 1/4 turn beyond hand-tight. Do not overtighten—excessive force can crack the valve body or strip the threads. The connections should be snug but not forced.
- Move Washer Back:
- Push the washer back into position, leaving a small gap from the wall for hose clearance (typically 4-6 inches).
- Restore Water Supply:
- Turn on both hot and cold water supply valves by turning them counterclockwise until fully open.
- Check for Leaks (Initial):
- Immediately after turning on the water supply, check the inlet valve connections for leaks. Look for water dripping from the supply hose connections or valve body. If leaks are present, turn off water supply, tighten connections, and check again.
- Restore Power:
- Plug the washer back into the electrical outlet or turn on the circuit breaker.
- Test Inlet Valve Operation:
- Run a NORMAL wash cycle without clothes. Watch and listen for the inlet valve to operate:The valve should open when the washer starts fillingYou should hear water flowing into the tubBoth hot and cold water should flow (for warm water fill)The valve should close when the water level is reachedNo water should leak from the valve or connections
- Verify Hot and Cold Water:
- During the test cycle, verify both hot and cold water are flowing correctly:Run a HOT water cycle and verify hot water enters the tubRun a COLD water cycle and verify cold water enters the tubRun a WARM water cycle and verify both hot and cold water mix properly
- Check for Leaks (Full Test):
- During the test cycle, monitor the inlet valve area carefully for any water leaks from the valve body, supply hose connections, or internal hose connections. Check both during fill and after the valve closes.
- Verify Proper Shut-Off:
- After the washer reaches the desired water level, verify the inlet valve closes completely and water stops flowing. Listen for any dripping or continuous water flow—the valve should shut off completely.
- Full Load Test:
- Run a complete wash cycle with a normal load of laundry to verify the inlet valve operates properly under normal conditions without leaks or fill issues.
Verified Compatible Models
GTW451BMR0WS, GTW460BMK0WW, GTW460BMK1WW, GTW465BMK0WS, GTW465BMK1WS, GTW485BMK0WS, GTW485BMK1WS, GTW485BMM1WS, GTW490BMR0WS, GTW550BMR0WS, GTW560BMM1WW, LGA77115CBAB00, LGA77115CBAB01, GTW460BMM0WW, GTW460BMM1WW, GTW465BMM0WS, GTW465BMM1WS, GTW470BMM0DG, GTW470BMM1DG, GTW485BMM0WS, GTW491BMR0DG, GTW491BMR0WS, GTW495DMN0WS, GTW495DMN1WS, GTW560BMM0WW, LGA77115CBAB02
Fitment reminder: Match the complete appliance model number, including suffix or revision where applicable, before ordering.
Buy Online Pick Up In-Store
Address
101 Trillium Dr
Kitchener, Ontario N2E 1W8
Kitchener, Ontario N2E 1W8
Phone
Hours
Mon–Fri 9 AM–5 PM • Sat 9 AM–1 PM



