W10841692 Range Wall Oven Electronic Control Board

XPart Supply Ltd. 883049841692

Sale price
$299.99
Regular price
$434.78
You save
$134.79 (31%)
Condition: New

Product variant with selected options does not exist!

Frequently Bought Together

Main Control Board, Electronic Control Module, PCB Assembly

WPW10841692, AP6023257, PS11757181, EAP11757181, W10258275, W10136011, W10258274, W10545255, W10436434

Whirlpool, KitchenAid, Maytag, Jenn-Air, Amana, Kenmore

WhirlpoolWFE525S0HZ0, WFE525S0HZ1, WFE525S0HZ2, WFE525S0HZ3, WFE525S0HV0, WFE525S0HV1, WFE525S0HV2, WFE525S0HV3, WFE525S0HW0, WFE525S0HW1, WFE525S0HW2, WFE525S0HW3, WFE525S0HS0, WFE525S0HS1, WFE525S0HS2, WFE525S0HS3, WFE540H0EZ0, WFE540H0EZ1, WFE540H0EZ2, WFE540H0EZ3, WFE540H0EW0, WFE540H0EW1, WFE540H0EW2, WFE540H0EW3, WFE540H0ES0, WFE540H0ES1, WFE540H0ES2, WFE540H0ES3, WFE540H0EB0, WFE540H0EB1, WFE540H0EB2, WFE540H0EB3, WFE550S0HZ0, WFE550S0HZ1, WFE550S0HZ2, WFE550S0HZ3, WFE550S0HV0, WFE550S0HV1, WFE550S0HV2, WFE550S0HV3, WFE550S0HW0, WFE550S0HW1, WFE550S0HW2, WFE550S0HW3, WFE550S0HS0, WFE550S0HS1, WFE550S0HS2, WFE550S0HS3, WFG525S0HZ0, WFG525S0HZ1, WFG525S0HZ2, WFG525S0HZ3, WFG525S0HV0, WFG525S0HV1, WFG525S0HV2, WFG525S0HV3, WFG525S0HW0, WFG525S0HW1, WFG525S0HW2, WFG525S0HW3, WFG525S0HS0, WFG525S0HS1, WFG525S0HS2, WFG525S0HS3, WFG540H0EZ0, WFG540H0EZ1, WFG540H0EZ2, WFG540H0EZ3, WFG540H0EW0, WFG540H0EW1, WFG540H0EW2, WFG540H0EW3, WFG540H0ES0, WFG540H0ES1, WFG540H0ES2, WFG540H0ES3, WFG550S0HZ0, WFG550S0HZ1, WFG550S0HZ2, WFG550S0HZ3

KitchenAidKFEG500EBS0, KFEG500EBS1, KFEG500EBS2, KFEG500EBS3, KFEG500ESS0, KFEG500ESS1, KFEG500ESS2, KFEG500ESS3, KFEG500EWH0, KFEG500EWH1, KFEG500EWH2, KFEG500EWH3, KFEG500EBL0, KFEG500EBL1, KFEG500EBL2, KFEG500EBL3, KFGG500EBS0, KFGG500EBS1, KFGG500EBS2, KFGG500EBS3, KFGG500ESS0, KFGG500ESS1, KFGG500ESS2, KFGG500ESS3, KFGG500EWH0, KFGG500EWH1, KFGG500EWH2, KFGG500EWH3, KFGG500EBL0, KFGG500EBL1, KFGG500EBL2, KFGG500EBL3, KFEG550EBS0, KFEG550EBS1, KFEG550EBS2, KFEG550EBS3, KFEG550ESS0, KFEG550ESS1, KFEG550ESS2, KFEG550ESS3, KFEG550EWH0, KFEG550EWH1, KFEG550EWH2, KFEG550EWH3, KFGG550EBS0, KFGG550EBS1, KFGG550EBS2, KFGG550EBS3, KFGG550ESS0, KFGG550ESS1, KFGG550ESS2, KFGG550ESS3, KFGG550EWH0, KFGG550EWH1, KFGG550EWH2, KFGG550EWH3

MaytagMER6600FZ0, MER6600FZ1, MER6600FZ2, MER6600FZ3, MER6600FW0, MER6600FW1, MER6600FW2, MER6600FW3, MER6600FB0, MER6600FB1, MER6600FB2, MER6600FB3, MER6600FS0, MER6600FS1, MER6600FS2, MER6600FS3, MER8600FZ0, MER8600FZ1, MER8600FZ2, MER8600FZ3, MER8600FW0, MER8600FW1, MER8600FW2, MER8600FW3, MER8600FB0, MER8600FB1, MER8600FB2, MER8600FB3, MER8600FS0, MER8600FS1, MER8600FS2, MER8600FS3, MGR6600FZ0, MGR6600FZ1, MGR6600FZ2, MGR6600FZ3, MGR6600FW0, MGR6600FW1, MGR6600FW2, MGR6600FW3, MGR6600FB0, MGR6600FB1, MGR6600FB2, MGR6600FB3, MGR8600FZ0, MGR8600FZ1, MGR8600FZ2, MGR8600FZ3, MGR8600FW0, MGR8600FW1, MGR8600FW2, MGR8600FW3

Jenn-AirJES1450DS00, JES1450DS01, JES1450DS02, JES1450DS03, JES1450FS00, JES1450FS01, JES1450FS02, JES1450FS03, JES1450WS00, JES1450WS01, JES1450WS02, JES1450WS03, JGS1450DS00, JGS1450DS01, JGS1450DS02, JGS1450DS03, JGS1450FS00, JGS1450FS01, JGS1450FS02, JGS1450FS03, JGS1450WS00, JGS1450WS01, JGS1450WS02, JGS1450WS03, JES1750DS00, JES1750DS01, JES1750DS02, JES1750DS03, JES1750FS00, JES1750FS01, JES1750FS02, JES1750FS03, JGS1750DS00, JGS1750DS01, JGS1750DS02, JGS1750DS03, JGS1750FS00, JGS1750FS01, JGS1750FS02, JGS1750FS03

AmanaAER6603SFS0, AER6603SFS1, AER6603SFS2, AER6603SFS3, AER6603SFW0, AER6603SFW1, AER6603SFW2, AER6603SFW3, AER6603SFB0, AER6603SFB1, AER6603SFB2, AER6603SFB3, AGR6603SFS0, AGR6603SFS1, AGR6603SFS2, AGR6603SFS3, AGR6603SFW0, AGR6603SFW1, AGR6603SFW2, AGR6603SFW3, AGR6603SFB0, AGR6603SFB1, AGR6603SFB2, AGR6603SFB3, AER6603SWS0, AER6603SWS1, AER6603SWS2, AER6603SWS3, AGR6603SWS0, AGR6603SWS1, AGR6603SWS2, AGR6603SWS3

Kenmore790.91312013, 790.91312014, 790.91312015, 790.91312016, 790.91313013, 790.91313014, 790.91313015, 790.91313016, 790.91314013, 790.91314014, 790.91314015, 790.91314016, 790.92312013, 790.92312014, 790.92312015, 790.92312016, 790.92313013, 790.92313014, 790.92313015, 790.92313016, 790.92314013, 790.92314014, 790.92314015, 790.92314016, 790.93312013, 790.93312014, 790.93312015, 790.93312016, 790.93313013, 790.93313014, 790.93313015, 790.93313016

Professional Repair Time: 60-90 minutes
DIY Repair Time: 90-120 minutes
Difficulty Rating: Advanced (4/5) — Requires rear panel removal, multiple wire harness connections, and careful component handling; significant mechanical and electrical skill required


Turn off the circuit breaker to the oven at the electrical panel to ensure complete power disconnection.

Verify power is off by attempting to turn on the oven. The display should be blank and the oven should not respond.

Allow the oven to cool completely if it was recently used. The control board and surrounding components can retain heat for several hours.

Remove the oven from the wall or cabinet (if it's a wall oven) or pull the range away from the wall (if it's a range oven) to provide adequate working space for accessing the rear panel.

Take multiple photos of the range or oven back panel and any visible wiring before disassembly. Document all wire harness connections and their positions from multiple angles. This is critical for proper reassembly.

Remove the rear access panel of the oven by locating and removing the screws that secure it (typically 6-10 screws around the perimeter). Set the panel aside.

Locate the main control board inside the oven cabinet. It's typically mounted on the back wall or side wall of the oven cabinet, near the top or center.

Label each wire harness connector with masking tape and a marker to identify its connection point (e.g., "heating element," "thermostat," "temperature sensor," "door lock," "display," "convection fan," "oven light").

Count the connectors on the control board. Most oven control boards have 8-15 connectors. Verify your count matches your photos.

Carefully disconnect all wire harness connectors from the control board one at a time. Pull connectors straight off—do not twist or bend. Some connectors have locking tabs that must be released first by pressing or lifting the tab.

Verify all connectors are disconnected before attempting to remove the control board.

Remove the mounting screws that secure the control board to the mounting bracket or cabinet wall (typically 2-4 screws).

Carefully lift the old control board out of the oven, noting its orientation and position.

Inspect the old control board for visible damage such as burnt components, melted solder joints, cracked circuit traces, corrosion, moisture damage, or discoloration. This confirms the diagnosis.

Inspect all wire harness connectors for corrosion, melted plastic, bent pins, or damage. Clean corroded connectors with a small wire brush or replace damaged connectors before installing the new board.

Unpack the new W10841692 control board from its anti-static packaging. Handle the board by the edges only—do not touch electronic components or circuit traces.

Compare the new control board to the old one to verify all connectors, mounting holes, and component layouts match. Ensure you have the correct replacement part.

Position the new control board in the same location and orientation as the old board.

Secure the control board with the mounting screws, tightening firmly but not over-tightening (which can crack the circuit board).

Reconnect each wire harness connector to the new control board, matching the labels you applied earlier. Ensure each connector is fully seated and clicks into place.

Verify all connections are secure by gently tugging on each connector. None should pull loose.

Double-check connector orientation to ensure no connectors are reversed or misaligned. Incorrect connections can damage the new board immediately upon power-up.

Verify no wires are pinched or kinked between the control board and the cabinet wall.

Count the connectors again to verify all connectors have been reconnected. The count should match your initial count.

  1. Reinstall the rear access panel by aligning it with the oven and securing all screws.
  2. Push the oven back into position against the wall or into the cabinet (if it's a wall oven).
  3. Turn the circuit breaker back on to restore power.
  4. Listen for the control board to initialize. You may hear a beep or see the display light up briefly as the board powers up.
  5. Check the control panel display for proper operation. The display should light up and respond to button presses.
  6. Verify the oven display shows the correct time or default values. If the display is blank or shows error codes, verify all connectors are fully seated.
  7. Run a test cycle (without food) on a preheat cycle to verify proper control board operation.
  8. Set the oven to 350°F and attempt to preheat.
  9. Verify the oven heating elements activate during preheating. You should hear a relay click or see the heating elements glow red.
  10. Verify the oven temperature increases during preheating. Use an oven thermometer to monitor temperature. The oven should reach 350°F within 10-15 minutes.
  11. Verify the oven maintains temperature once it reaches the set point. The temperature should remain stable within ±10°F of the set temperature.
  12. Verify the display panel responds to button presses. Buttons should respond immediately when pressed, and the display should update accordingly.
  13. Test the oven timer function (if available). Set a timer for 5 minutes and verify it counts down properly.
  14. Test the convection fan (if equipped). The fan should run during convection bake cycles and be silent during regular bake cycles.
  15. Test the oven light (if equipped). The light should turn on when the door is opened and turn off when the door is closed.
  16. Test the door lock (if equipped). The lock should engage during self-cleaning cycles and disengage when the cycle completes.
  17. Monitor the oven for 15-20 minutes to ensure it maintains proper temperature without error codes or shutdowns.
  18. If the oven does not turn on, verify the control board connectors are fully seated and the circuit breaker is on. Test the power supply with a multimeter.
  19. If the oven does not heat, verify the heating element connector is fully seated and the heating element is functioning. Test the heating element with a multimeter.
  20. If the display is blank, verify the display connector is fully seated and the power supply is correct. Test the display with a multimeter.
  21. If error codes appear, note the code and consult the service manual for code definitions. Common codes include sensor errors, heating element faults, or communication failures.
  22. If the oven overheats, verify the temperature sensor is functioning properly and the thermostat is controlling the heating element. Test the temperature sensor with a multimeter.
  23. If the oven temperature fluctuates wildly, the temperature sensor may be faulty or the thermostat may be malfunctioning. Verify sensor connections and test with a multimeter.
  24. If buttons do not respond, verify the control panel connector is fully seated. Test the control panel with a multimeter.
  25. If the convection fan does not run, verify the fan connector is fully seated and the fan motor is functioning. Test the fan with a multimeter.
  26. If the oven light does not work, verify the light connector is fully seated and the light bulb is not burnt out. Replace the bulb if necessary.
  27. Run a full baking test with a simple recipe (such as cookies or a cake) to verify the oven maintains consistent temperature throughout the cooking cycle.
  28. Monitor the oven for 24-48 hours of normal use to ensure it reaches and maintains proper operation.

Safety Notes: Always turn off the circuit breaker before working on the oven. Control boards contain capacitors that can store electrical charge—wait at least 5 minutes after unplugging before touching the board. Handle the control board carefully to avoid damaging electronic components. Never operate the oven without the control board installed. Ensure proper wire harness connections to prevent electrical shorts or fires. If you're uncomfortable working with electrical components, consult a professional technician.

Always test other components before replacing the control board. Control boards are frequently misdiagnosed—temperature control problems can also be caused by a faulty thermostat, temperature sensor failure, heating element malfunction, or faulty door lock. Before replacing the board, test the heating element, thermostat, temperature sensor, and door lock with a multimeter. A faulty component can cause symptoms that mimic board failure.

Verify the temperature sensor is functioning properly. The temperature sensor (thermostat) sends temperature feedback to the control board. A faulty sensor causes the oven to overheat, fail to heat, or display incorrect temperatures. Test the sensor with a multimeter—it should show changing resistance values as temperature changes. If resistance doesn't change, the sensor is faulty.

Test the heating element for continuity. A faulty or open heating element prevents the oven from heating. Set a multimeter to continuity mode and test the heating element terminals. A good element shows continuity (beep or low resistance). No continuity indicates a faulty element that needs replacement.

Check all electrical connections for corrosion or looseness. Corroded or loose connections can cause intermittent operation, error codes, or power supply problems. Inspect all connectors and terminals for corrosion, discoloration, or looseness. Clean corroded connections with a wire brush and tighten loose connections.

Verify the power supply voltage is correct. The control board requires proper voltage (typically 120V AC) to function. Use a multimeter to test the voltage at the power input terminals. If voltage is low or absent, the power supply may be faulty or the circuit breaker may be tripped.

Document all connector positions before disconnection. Take extensive photos of all wire harness connections from multiple angles. Your photos are your roadmap for reassembly and help ensure proper reconnection of all components. Incorrect connections can damage the new board immediately upon power-up.

Handle the control board with extreme care. Control boards contain sensitive electronic components that can be damaged by static electricity, rough handling, or moisture. Handle the board by the edges only—never touch electronic components or circuit traces. Use an anti-static wrist strap if available.

This control board is model-specific. The W10841692 is designed for specific Whirlpool and affiliated brand ovens and ranges. Always verify your oven model number matches one of the compatible models before ordering. Using an incorrect board can result in non-fit or improper oven operation.

Monitor the first few cooking cycles after installation. After installing the new control board, run several cooking cycles and monitor for proper heating, temperature control, error codes, and display function. Address any issues immediately before they affect cooking performance or indicate improper installation.

Oven control board failure can have multiple causes. If the new control board doesn't solve the problem, the issue may be with the power supply, thermostat, temperature sensor, heating element, or another component. Further diagnosis may be required to identify the root cause.

Never attempt to repair a control board. Control boards contain complex circuitry and cannot be repaired by soldering or component replacement. Always replace the entire board if it's faulty. Attempting repairs can create safety hazards or cause further damage.

Keep the control board dry. Moisture intrusion is a primary cause of control board failure. Ensure the oven cabinet is dry and there are no active leaks before installing the new board. Regularly inspect the board area for signs of water damage or corrosion.

Oven does not turn on (completely dead control panel)

Oven does not heat (heating elements don't activate)

Oven displays error codes

Control panel display is blank

Oven cycles on and off erratically

Control panel does not respond to button presses

Oven has intermittent operation

Oven fails to maintain proper temperature

Oven overheats excessively

Self-cleaning cycle does not function

Convection fan does not run

Door lock does not engage

Oven light does not work

Temperature fluctuates wildly

Oven shuts down during cooking

Display shows incorrect temperature readings


Whirlpool refrigerator replacement parts, Frigidaire refrigerator replacement parts, GE refrigerator replacement parts, Kenmore refrigerator replacement parts, KitchenAid refrigerator replacement parts, LG refrigerator replacement parts, Maytag refrigerator replacement parts, Whirlpool refrigerator drawers and glides replacement, Whirlpool dishwasher replacement parts, GE dishwasher replacement parts, KitchenAid dishwasher replacement parts, Maytag dishwasher replacement parts, Frigidaire dishwasher replacement parts, Kenmore dishwasher replacement parts, Whirlpool washer replacement parts, GE washer replacement parts, Maytag washer replacement parts, Kenmore washer replacement parts, LG washer replacement parts, Whirlpool dryer replacement parts, GE dryer replacement parts, Maytag dryer replacement parts, Kenmore dryer replacement parts, LG dryer replacement parts, Whirlpool range replacement parts, GE range replacement parts, Whirlpool stove replacement parts, GE stove replacement parts, GE oven replacement parts, GE microwave replacement parts, buy Whirlpool refrigerator parts online, buy GE dishwasher parts online, replacement Kenmore washer parts for sale, buy Maytag dryer parts, LG washer replacement parts online, KitchenAid refrigerator parts for sale, Whirlpool stove and range replacement parts

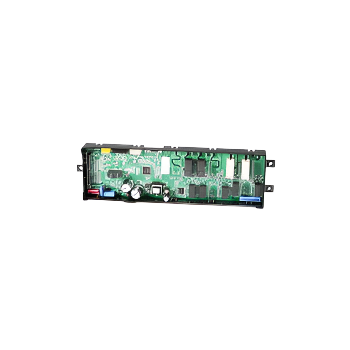
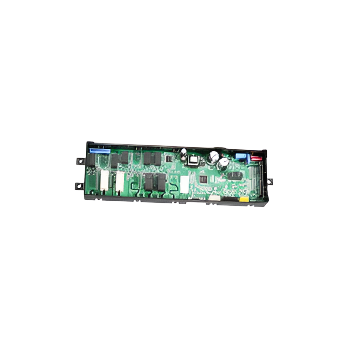
Upgrade Your Oven with the W10841692 Electronic Control Board

The W10841692 is a genuine OEM electronic control board (also called the main control board or PCB assembly) for Whirlpool and affiliated brand wall ovens and range ovens. This board is the central "brain" of the oven, managing all electronic functions including temperature control, heating element activation, timer functions, self-cleaning cycle control, convection fan operation, display panel communication, and safety interlocks. The control board receives input signals from the oven temperature sensor (thermostat), user controls (buttons and knobs), door lock switch, and safety sensors, then sends output signals to activate the heating elements, convection fan, oven light, door lock solenoid, and display panel. Over time, control boards can fail due to power surges or electrical spikes, component burnout from thermal stress, moisture intrusion from steam or condensation, manufacturing defects, solder joint failures from repeated thermal cycling, or normal wear from extended use. When the main control board fails, symptoms can vary widely—the oven may not turn on at all (completely dead), may not heat (heating elements don't activate), may display error codes, may have a blank display panel, may cycle on and off erratically, may not respond to button presses, may have intermittent operation, or may fail to maintain proper temperature. The oven may overheat excessively, the self-cleaning cycle may not function, the convection fan may not run, or the door lock may not engage. The W10841692 is a direct replacement for older control board models and restores proper oven operation. Replacing a faulty control board eliminates temperature control problems, error codes, and intermittent faults caused by board failure. Important: Control boards are frequently misdiagnosed—always test other components (heating element, thermostat, temperature sensor, door lock) before replacing the board.

Key Features and Design

  • Compatibility: Seamlessly replaces parts like W10759197 and W10759199, and is compatible with popular models such as MEW9527DS01 and WOS92EC0AS03, ensuring a perfect fit for your Whirlpool or Maytag oven.
  • Advanced Functionality: Engineered for accurate temperature and setting management, this control board features durable electronic components that provide stable operation for everyday cooking needs.
  • Quality Craftsmanship: As a genuine OEM part from XPart Supply Ltd., it boasts reliable construction to withstand the demands of frequent use, backed by the brand's reputation for high-quality appliance parts.

Performance and Benefits

This control board enhances your oven's performance by delivering precise control over cooking settings, helping to solve issues like inaccurate temperatures or unresponsive functions. Whether you're baking, roasting, or broiling, it ensures even results and extends the life of your appliance, making meal preparation more efficient and enjoyable. Trust XPart Supply Ltd. for parts that keep your kitchen running smoothly, with the assurance of quality that saves you time and money on repairs.

This W10841692 Range Wall Oven Electronic Control Board provides optimal control and precision for your cooking needs. With a part you can trust the quality and reliability of this essential component. Easily manage your oven's functions and settings, ensuring perfectly cooked meals every time.

Part number W10841692 replaces W10759197, W10759199, W10844214

Supported Models:

MEW9527DS01, MEW9527FB00, MEW9527FB01, MEW9527FW00, MEW9527FW01, MEW9527FZ01, MEW9527FZ02, MEW9527FZ03, MEW9527FZ04, MEW9530DS01, MEW9530FB00, MEW9530FB01, MEW9530FW00, MEW9530FW01, MEW9530FZ01, MEW9530FZ02, MEW9530FZ03, MEW9530FZ04, WOS92EC0AB03, WOS92EC0AB04, WOS92EC0AB05, WOS92EC0AE03, WOS92EC0AE04, WOS92EC0AE05, WOS92EC0AH03, WOS92EC0AH04, WOS92EC0AS03, WOS92EC0AS04, WOS92EC0AS05, WOS92EC7AB03, WOS92EC7AB04, WOS92EC7AS03, WOS92EC7AS04

✅ In-Stock for Same Day Shipping

Currently in stock: 3 units available
Our inventory is updated in real-time and high-demand products sell out quickly.
“Limited quantity available! This product is on backorder with the manufacturer, so purchase today to secure yours.”

"On Order - Arriving Soon"

24/7 Call Us 833-899-7278 for estimated time of arrival.
Item has been placed on order with the manufacturer, once the item has shipped you will be updated with tracking.
Price Guarantee: Whenever you pre-order an eligible item, the price you pay will be the lowest price offered by XPart Supply Ltd. between the time you place your order up to and including the release date.

Over 10,000 Parts In Stock Ready To Ship

Hard to find parts? We've got them or we'll find them!

Show this item number to our store staff to help locate the exact part you need
XPART GTIN/UPC NUMBER
9832693072161

Trusted Family Business

29 years of Excellence in Appliance Parts

For over 29 years, our family has been dedicated to providing quality appliance parts and exceptional service. What started as a small local business has grown into a trusted name, but we've never forgotten our roots. Every customer receives the personal attention and care that only a family-owned business can provide.

Years of Experience

Our knowledge has been built over the past 29 years in the business, ensuring expert advice for every appliance need.

Personal Service Guarantee

We treat every customer like family, providing personalized solutions and standing behind our products.

Built on Trust

Our reputation has been built one satisfied customer at a time, creating lasting relationships in our community.

XPart Supply Advantage

Your trusted partner for fast, reliable parts delivery across North America

Lightning Fast Shipping

Same-day processing with expedited delivery options across North America

Massive Inventory

Over 10,000 parts in stock and ready to ship immediately

North America Coverage

Comprehensive shipping network covering USA, Canada, and Mexico

Quality Guaranteed

Premium parts with warranty protection and expert customer support

10K+
Parts in Stock
24-48H
Local Delivery
99.8%
Customer Satisfaction
Professional appliance parts warehouse with organized shelving and extensive inventory

Express Warehouse Shipping

Order within the countdown for same-day shipping!

00 Hours
00 Minutes
00 Seconds

In stock orders placed during business hours ship the same day.

Order of $75 or more of eligible items qualify for FREE Shipping.

Same-day shipping deadline has passed

Orders placed now will ship the next business day.

Same-day shipping deadline has passed

Orders placed outside business hours will be processed when we reopen.

Business Hours: Monday - Friday, 9:00 AM - 5:00 PM EST

Buy Online Pick Up In-Store

Address
101 Trillium Dr
Kitchener, Ontario N2R 1J8
Phone
Hours
Monday - Friday 9:00 AM - 5:00 PM
Get Directions

Contact Us Customer Service

Hard to find parts? We've got them or we'll find them!

Call now for expert appliance parts assistance

Available Monday - Friday, 9AM - 5PM EST