Menu


Fridge Not Cooling — or Freezing Food? Air Damper W11087463 – Fix Temperature Control Fast
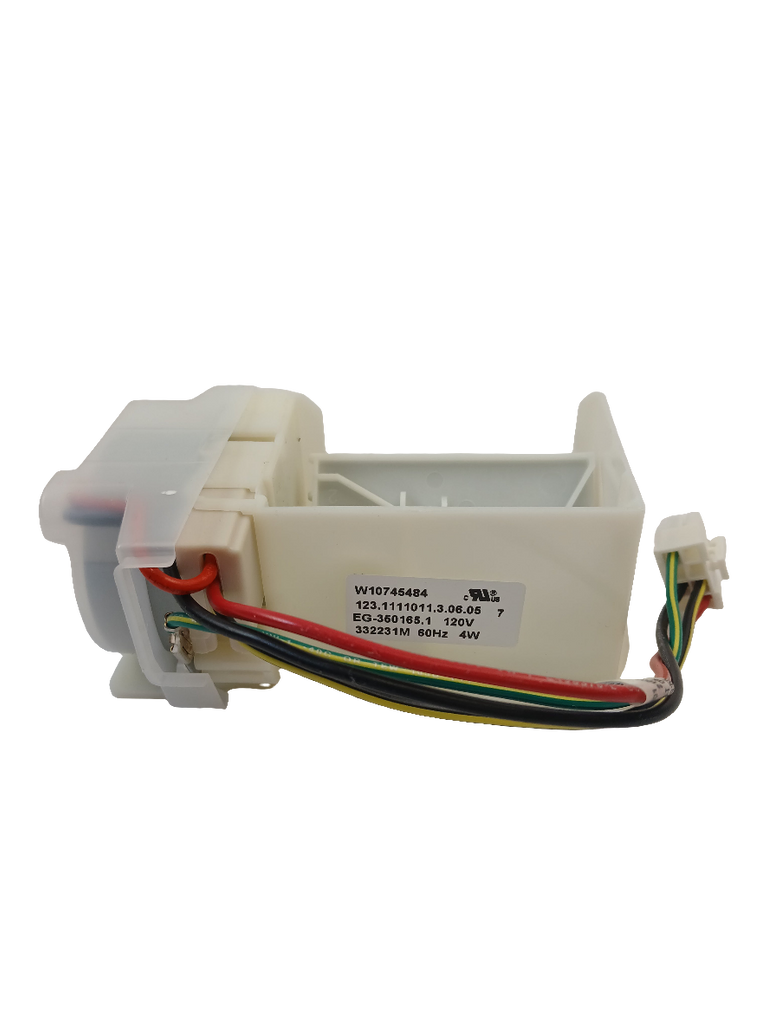
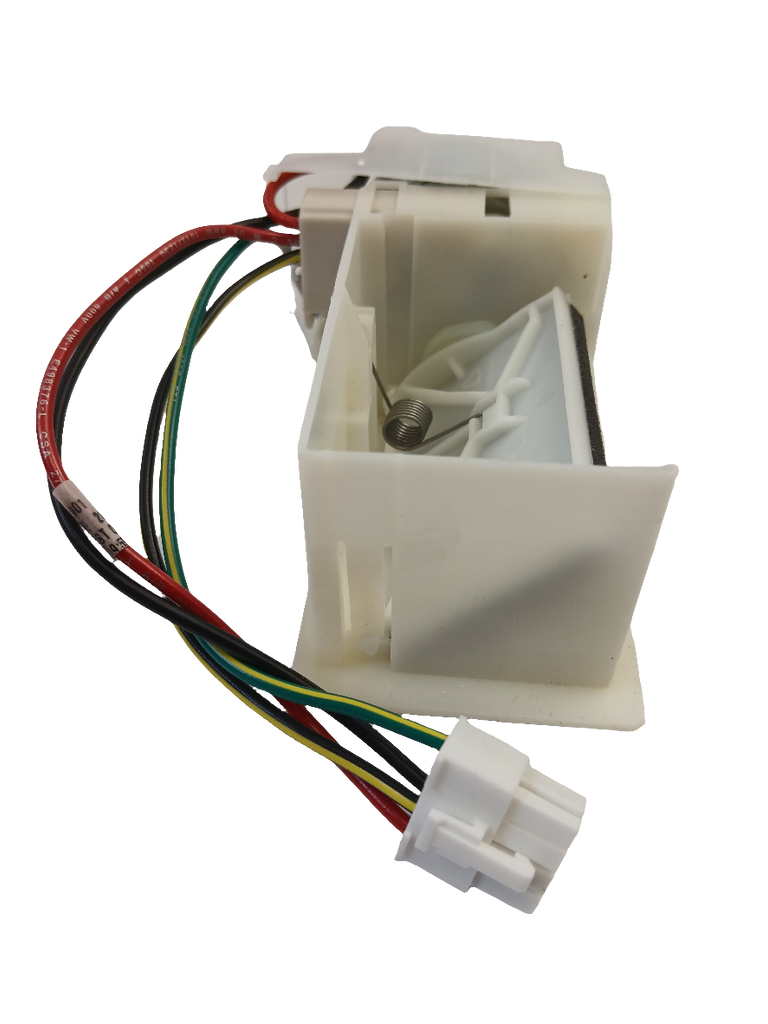
A refrigerator that can't cool the fresh food section — or one that freezes everything inside — is almost always a failed air damper. In Whirlpool-platform French door and bottom-freezer refrigerators, the air damper controls how much cold air flows from the freezer into the fresh food compartment — when it fails stuck closed, the fridge warms up; stuck open, it freezes food solid. ⚡ Item #35 in the parts diagram — high-failure component in Whirlpool, KitchenAid, and Maytag refrigerators. Part W11087463 is the genuine OEM replacement damper assembly (motor + door + housing + thermistor) that restores precise temperature control and directly supersedes W10745484 — no modification required. Also available as XPart (W11087463CM).
Model-specific repair guides: WRFA60SMHZ00, WRFA60SMHN00, WRFA60SFHZ00, WRFA60SFHN00, WRF560SMYW05, WRF560SMYM05, WRF560SMYH04, WRF560SMYE04, WRF560SMYB05, WRF560SMHZ00, WRF560SMHW00, WRF560SMHV00, WRF560SMHM00, WRF560SMHB00, WRF560SFYW05, WRF560SFYM05, WRF560SFYH04, WRF560SFYE03, WRF560SFYB05, WRF560SFHZ00, WRF560SFHW00, WRF560SFHV00, WRF560SFHB00, WRF560SEYW05, WRF560SEYW04, WRF560SEYM05, WRF560SEYM04, WRF560SEYB05, WRF560SEYB04, WRF560SEHZ00, WRF560SEHW00, WRF560SEHV00, WRF560SEHB00, WRB543CMJZ00, WRB543CMJV00, WRB533CZJZ00, WRB533CZJW00, WRB533CZJB00, MFW2055YEW01, MFW2055YEM01, MFW2055YEB01, MFW2055FRZ00, MFW2055FRH00, MFW2055DRM01, MFW2055DRH01, MFW2055DRE01, MFF2055FRZ00, MFF2055FRW00, MFF2055FRB00, MFF2055DRM01, MFF2055DRH01, MFF2055DRE01, MFB2055FRZ00, MFB2055FRW00, MFB2055DRM01, MFB2055DRH01, MFB2055DRE01, KRFF300EWH01, KRFF300ESS01, KRFF300EBS00, IX5BBEXDS01, IX5BBEXDS00, 59673009510, 59673003510, 59673002510, 10679473411, 10679473410, 10679472411, 10679472410, 10679403410, 10679402410, 10673009511, 10673009510, 10673003511, 10673003510, 10673002511, 10673002510
❓ Is This the Right Part?
This is the correct fix if ALL of the following are true:
- ✔ Your refrigerator powers on and the freezer section is cold
- ✔ The evaporator fan runs and air circulates in the freezer
- ✔ No ice buildup blocking the air duct (melt and retest first)
- ✔ Control board voltage confirmed at the damper connector when fridge calls for cooling
- ✔ ONLY problem is the fresh food section too warm, too cold, or temperature swinging erratically
Not sure? Send us your model number — we'll confirm before you order.
🔧 Common Symptoms
- Fresh food section too warm while freezer stays cold — most common complaint
- Food freezing in the refrigerator compartment
- Temperature fluctuations — some areas warm, others too cold
- Refrigerator runs continuously without reaching set temperature
- Frost or ice buildup around the air damper vents
- Clicking, buzzing, or grinding noise from the refrigerator ceiling area
✔ If these symptoms match, the air damper is the most likely failed component in the temperature control circuit.
✔ In most cases, replacing the damper assembly restores precise fresh food temperature control immediately.
📦 Part Details
- OEM Part Number: W11087463
- XPart Part Number: W11087463CM
- Type: Genuine OEM Refrigerator Air Damper Assembly — includes motor, door, housing, and thermistor (Item #35 in diagram)
- Replaces: OEM direct-fit assembly — supersedes W10745484 (no modification required)
- Brands: Whirlpool, KitchenAid, Maytag
⚠️ Recommended While Repairing:
While the damper cover is off, test the thermistor resistance — it should read ~10,000–15,000 ohms at room temperature. A reading of OL or near-zero confirms the thermistor has failed and is causing incorrect temperature readings even with a good damper motor. The thermistor is included in the W11087463 assembly, so replacing the full unit covers both failure points.
While the damper cover is off, test the thermistor resistance — it should read ~10,000–15,000 ohms at room temperature. A reading of OL or near-zero confirms the thermistor has failed and is causing incorrect temperature readings even with a good damper motor. The thermistor is included in the W11087463 assembly, so replacing the full unit covers both failure points.
⚙️ Installation Notes
Skill Level: MODERATE — Allow 60–90 minutes. Unplug the refrigerator before beginning any work. Remove top shelves and bins from the fresh food section to access the damper housing at the upper rear wall. Photograph all wire harness connections before disconnecting — grip the connector housing, not the wires. Remove the damper cover screws (typically 2–4; some covers use snap clips — pry gently). Check the air duct for ice buildup before installing the new damper — if ice is present, a defrost system fault is the root cause and must be fixed first. Do not overtighten mounting screws as the plastic housing cracks easily. After installation, restore power and allow 24 hours for temperatures to fully stabilize.
💡 Pro Tip
Check the Duct for Ice Before You Order:
An estimated 30% of apparent damper failures are actually ice buildup in the air duct blocking the damper door — not a failed motor. Remove the damper cover and inspect the duct: if you see frost or ice, melt it with a hair dryer and retest. If the damper works after defrosting, your real problem is a defrost system fault (bad heater, thermostat, or timer) — fix that first or the new damper will fail again within weeks. Only replace the damper when the motor is confirmed failed with no voltage fault at the control board.
An estimated 30% of apparent damper failures are actually ice buildup in the air duct blocking the damper door — not a failed motor. Remove the damper cover and inspect the duct: if you see frost or ice, melt it with a hair dryer and retest. If the damper works after defrosting, your real problem is a defrost system fault (bad heater, thermostat, or timer) — fix that first or the new damper will fail again within weeks. Only replace the damper when the motor is confirmed failed with no voltage fault at the control board.

✅Compatibility & Cross Reference
Not sure about your model number? Call 1-877-899-7278 and we’ll help you confirm. All brand names are the property of their respective owners and are used for compatibility reference only.

Buy Online Pick Up In-Store
Address
101 Trillium Dr
Kitchener, Ontario N2E 1W8
Kitchener, Ontario N2E 1W8
Phone
Hours
Mon–Fri 9 AM–5 PM • Sat 9 AM–1 PM

- Choosing a selection results in a full page refresh.


