W11747452 Range Convection Fan

W11747452 Range Convection Fan

Sale price
$131.56
Regular price
$188.50
You save
$56.94 (30%)

XPart Number: 10161142464801   |   GTIN: 5608329070671

Frequently Bought Together

Guaranteed to fit your model: Need help? Call 833-899-7278

Shipper / Seller: XPart Supply Ltd.

Professional: 45-60 minutes
DIY: 90-120 minutes
Difficulty Level: Medium repair (requires oven disassembly and access to rear cavity)

  • Convection mode doesn't work (fan doesn't run)
  • Oven displays error codes related to convection fan
  • Loud grinding or squealing noise during convection cooking
  • Rattling or vibrating sound from rear of oven
  • Convection fan runs but makes clicking or scraping noises
  • Uneven cooking or baking in convection mode
  • Oven overheats in certain areas during convection
  • Convection fan starts then stops immediately
  • Burning smell during convection mode operation
  • Fan blade doesn't spin or spins very slowly
  • Convection cooking times are much longer than normal
  • Visible damage to fan blade (bent, cracked, or broken)
  • Fan motor hums but blade doesn't rotate
  • Intermittent convection fan operation (works sometimes, not others)
  • Oven trips circuit breaker when convection mode is selected

W11396033, W11223019, W10823696, W10519956, W10519018, PS11756337, AP6022534

Fits Models: (Ctrl+F and Enter Your Model Number)

Whirlpool: WFE550S0HZ0, WFE550S0HV0, WFE550S0HW0, WFE550S0LZ0, WFE550S0LV0, WFE710H0AH0, WFE710H0AS0, WFE975H0HZ0, WFE975H0HV0

KitchenAid: KFEG500ESS0, KFEG500ESS1, KFEG500EWH0, KFEG500EBL0, KFES530ESS0, KFES530EWH0, KFGD500ESS0, KFGD500EWH0, KFGG500ESS0

Maytag: MER6600FZ0, MER6600FZ1, MER8600FZ0, MER8600FZ1, MER8800FZ0, MER8800FZ1, MGR6600FZ0, MGR8600FZ0, MGR8800FZ0

Jenn-Air: JES1450DS01, JES1450DS02, JES1450FS01, JES1750DS01, JES1750FS01, JGS1450DS01, JGS1450FS01, JGS1750DS01

Amana: AER6603SFS0, AER6603SFS1, AER6603SFW0, AER6603SFB0, AGR6603SFS0, AGR6603SFW0

Note: This is a partial list. This convection fan is used in many Whirlpool-manufactured ranges with true convection or European convection systems built between 2015-2025. Verify your specific model number for compatibility before ordering.

Required Tools:

  • Phillips screwdriver
  • Flathead screwdriver
  • 1/4" nut driver
  • Needle-nose pliers
  • Work gloves (heat-resistant recommended)
  • Flashlight
  • Towel or blanket (to protect range surface)

Step-by-Step Installation:

  1. Disconnect Power: Turn off the circuit breaker to the range or unplug it from the electrical outlet. For dual-fuel ranges, also shut off the gas supply valve. Never work on the range with power connected.
  2. Allow Oven to Cool: If the oven was recently used, wait at least 2 hours for it to cool completely. The convection fan area can remain hot long after cooking.
  3. Remove Oven Racks: Pull out all oven racks and set them aside to provide clear access to the oven interior.
  4. Locate Convection Fan Cover: Open the oven door. The convection fan is located on the rear wall of the oven cavity, covered by a metal shield or cover plate (typically circular or rectangular).
  5. Remove Fan Cover Screws: Remove the screws securing the convection fan cover to the rear oven wall (typically 3-6 screws around the perimeter). Keep these screws—you'll need them for reinstallation.
  6. Remove Fan Cover: Carefully pull the fan cover straight off the rear wall. It may be tight due to gasket seals or heat expansion. Set the cover aside.
  7. Access Fan Assembly: With the cover removed, you'll see the convection fan blade and motor assembly mounted to the rear of the oven cavity.
  8. Remove Fan Blade (if separate): Some models have a removable fan blade. If yours does, locate the center retaining nut or clip holding the blade to the motor shaft. Use a wrench or pliers to remove the nut (it may have reverse threads—turn clockwise to loosen). Pull the fan blade off the motor shaft. If the blade is integrated with the motor assembly, skip this step.
  9. Disconnect Wire Harness: Reach behind the rear oven wall (you may need to access from the back of the range by removing the rear panel). Locate the wire harness connector for the convection fan motor. Press the release tab and pull the connector apart. Take a photo for reference.
  10. Remove Mounting Bracket Screws: The convection fan motor is secured to a mounting bracket with screws (typically 2-4 screws). Remove these mounting screws. You may need to access them from inside the oven cavity or from behind the rear panel, depending on your model.
  11. Remove Old Fan Assembly: Once the mounting screws are removed, carefully pull the old convection fan motor assembly out of the oven cavity. Maneuver it through the opening in the rear wall. Be careful not to damage any surrounding insulation or wiring.
  12. Inspect Mounting Area: Check the mounting bracket and rear oven wall for damage, corrosion, or debris. Wipe clean with a dry cloth. Inspect the wire harness for damage or melted insulation.
  13. Prepare New Fan Assembly: Remove the new convection fan motor assembly from its packaging. Verify it includes the motor, fan blade (if integrated), mounting bracket, and any necessary hardware.
  14. Position New Fan Assembly: Carefully insert the new convection fan assembly through the opening in the rear oven wall. Align the mounting bracket with the screw holes.
  15. Install Mounting Screws: Secure the fan motor assembly to the mounting bracket with the mounting screws. Tighten firmly but do not overtighten—excessive force can crack the mounting bracket or strip threads.
  16. Reconnect Wire Harness: Plug the wire harness connector back together. Ensure it clicks securely into place and is fully seated. Verify the connection is tight and won't pull apart.
  17. Install Fan Blade (if separate): If your model has a separate fan blade, slide it onto the motor shaft. Ensure any keyways or flats on the shaft align with the blade hub. Secure with the retaining nut or clip. Tighten securely (remember: reverse threads turn clockwise to tighten on some models).
  18. Test Fan Rotation: Manually spin the fan blade to ensure it rotates freely without binding, rubbing, or hitting the rear wall or cover. The blade should spin smoothly with no obstruction.
  19. Reinstall Fan Cover: Position the convection fan cover back onto the rear oven wall, aligning the screw holes. Ensure any gasket or seal is properly positioned.
  20. Secure Fan Cover: Install the cover screws and tighten securely. Ensure the cover is flush against the rear wall with no gaps.
  21. Reinstall Oven Racks: Slide the oven racks back into the oven cavity.
  22. Restore Power: Turn on the circuit breaker or plug the range back in. For dual-fuel ranges, turn the gas supply back on.
  23. Test Convection Mode: Set the oven to CONVECTION BAKE or CONVECTION ROAST mode at 350°F. Within 1-2 minutes, you should hear the convection fan start running. Listen for smooth, quiet operation without grinding, squealing, or rattling noises.
  24. Verify Airflow: With the oven door open slightly (for safety), feel for air circulation from the convection fan vents. You should feel warm air being circulated throughout the oven cavity.
  25. Full Temperature Test: Allow the oven to preheat fully to 350°F in convection mode. Verify the fan runs continuously and the oven reaches and maintains the set temperature evenly.

Test the fan motor electrically before replacing. Before ordering a $150+ convection fan assembly, verify the motor is actually faulty. With power disconnected, use a multimeter to test the motor windings for continuity. Disconnect the wire harness and test across the motor terminals—you should read approximately 30-80 ohms (varies by model). An infinite reading means the motor windings are open (burned out). A reading near zero indicates a short circuit. Also check for 120V power at the wire harness connector when convection mode is activated—no power means the problem is the control board or wiring, not the fan motor.Bearing failure is the most common cause of fan noise. If your convection fan is making grinding, squealing, or rattling noises, the motor bearings are worn out. Bearings fail due to age, heat exposure, and continuous use. Once bearings fail, the motor will seize completely within weeks or months. Don't ignore fan noise—it's an early warning sign. Replacing the fan at the first sign of noise prevents complete failure and potential damage to the control board from motor overload.

Check for obstructions before blaming the motor. Sometimes convection fans fail to run or make noise because something is blocking the blade—food debris, insulation, or a warped fan cover. With power disconnected, manually spin the fan blade. It should rotate freely with no resistance or rubbing. If it binds or hits something, clear the obstruction before replacing the motor. An estimated 15% of "fan motor failures" are actually just obstructions.

Verify proper voltage to the motor. Convection fan motors require 120V AC to operate. If your fan won't run, use a multimeter to verify the control board is sending power to the motor when convection mode is activated. With the oven in convection mode and the wire harness disconnected, test for 120V at the harness connector. No voltage means the problem is the control board, relay, or wiring—not the fan motor. This diagnostic step saves you from replacing a motor that isn't broken.

Blade balance and clearance matter. When installing the new fan assembly, ensure the blade is properly balanced and has adequate clearance from the rear wall and fan cover. An unbalanced blade causes vibration and premature bearing failure. The blade should have 1/4" to 1/2" clearance on all sides. If the blade rubs or hits the cover, adjust the motor mounting position or check for a warped cover.

High-temperature environments accelerate fan failure. Convection fans operate in 300-500°F environments during normal use. This extreme heat degrades motor windings, bearings, and insulation over time. If you frequently use convection mode at high temperatures (450°F+) or for extended periods (roasting, slow cooking), expect shorter fan motor life—typically 5-8 years instead of 10-15 years. This is normal wear, not a defect.

Control board issues can mimic fan failure. If your new fan motor doesn't run after installation, the problem may be the oven control board, not the fan. The control board sends power to the fan motor when convection mode is selected. A failed relay or damaged circuit on the control board prevents the fan from running. Before replacing the control board, verify all wire connections are secure and test for voltage at the fan motor connector during convection mode.


Whirlpool refrigerator replacement parts, Frigidaire refrigerator replacement parts, GE refrigerator replacement parts, Kenmore refrigerator replacement parts, KitchenAid refrigerator replacement parts, LG refrigerator replacement parts, Maytag refrigerator replacement parts, Whirlpool refrigerator drawers and glides replacement, Whirlpool dishwasher replacement parts, GE dishwasher replacement parts, KitchenAid dishwasher replacement parts, Maytag dishwasher replacement parts, Frigidaire dishwasher replacement parts, Kenmore dishwasher replacement parts, Whirlpool washer replacement parts, GE washer replacement parts, Maytag washer replacement parts, Kenmore washer replacement parts, LG washer replacement parts, Whirlpool dryer replacement parts, GE dryer replacement parts, Maytag dryer replacement parts, Kenmore dryer replacement parts, LG dryer replacement parts, Whirlpool range replacement parts, GE range replacement parts, Whirlpool stove replacement parts, GE stove replacement parts, GE oven replacement parts, GE microwave replacement parts, buy Whirlpool refrigerator parts online, buy GE dishwasher parts online, replacement Kenmore washer parts for sale, buy Maytag dryer parts, LG washer replacement parts online, KitchenAid refrigerator parts for sale, Whirlpool stove and range replacement parts

Premium W11747452 Range Convection Fan by XPart Supply Ltd.

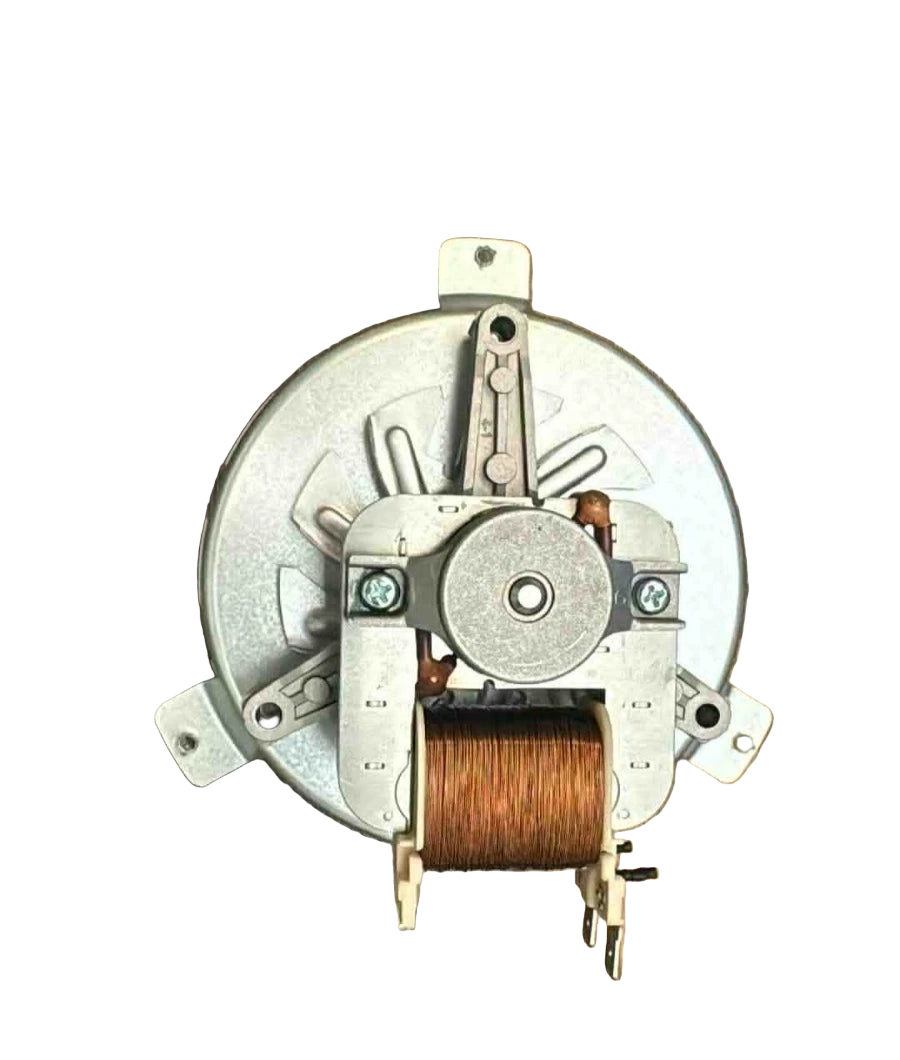
Discover the reliable performance of the W11747452 Range Convection Fan, a genuine OEM replacement part designed to enhance your cooking experience. This essential component, which seamlessly replaces older models like W11665503, ensures even heat distribution for faster, more efficient baking and roasting in your range or oven.

Crafted by XPart Supply Ltd., a trusted name in appliance parts known for their commitment to quality and durability, this fan is built to withstand daily use while restoring optimal convection functionality. Whether you're dealing with uneven cooking or a malfunctioning fan, upgrading to the W11747452 means enjoying precise temperature control and improved energy efficiency in your kitchen.

  • Enhanced Cooking Performance: Delivers consistent airflow for professional-level results, reducing cooking times and ensuring evenly baked meals.
  • Easy Installation: Designed for compatibility with select Whirlpool and KitchenAid ranges, making it a straightforward swap for DIY enthusiasts.
  • Durable Construction: Made with high-quality materials from XPart Supply Ltd. to provide long-lasting reliability and peace of mind.

Choose the W11747452 Convection Fan from XPart Supply Ltd. to elevate your home cooking setup—it's the smart choice for maintaining your appliance's peak performance and extending its lifespan.

W11747452 replaces W11665503 

Cross Reference Information

W11396033, W11223019, W10823696, W10519956, W10519018, PS11756337, AP6022534

Guaranteed to Fit Your Model

Whirlpool: WFE550S0HZ0, WFE550S0HV0, WFE550S0HW0, WFE550S0LZ0, WFE550S0LV0, WFE710H0AH0, WFE710H0AS0, WFE975H0HZ0, WFE975H0HV0

KitchenAid: KFEG500ESS0, KFEG500ESS1, KFEG500EWH0, KFEG500EBL0, KFES530ESS0, KFES530EWH0, KFGD500ESS0, KFGD500EWH0, KFGG500ESS0

Maytag: MER6600FZ0, MER6600FZ1, MER8600FZ0, MER8600FZ1, MER8800FZ0, MER8800FZ1, MGR6600FZ0, MGR8600FZ0, MGR8800FZ0

Jenn-Air: JES1450DS01, JES1450DS02, JES1450FS01, JES1750DS01, JES1750FS01, JGS1450DS01, JGS1450FS01, JGS1750DS01

Amana: AER6603SFS0, AER6603SFS1, AER6603SFW0, AER6603SFB0, AGR6603SFS0, AGR6603SFW0

Note: This is a partial list. This convection fan is used in many Whirlpool-manufactured ranges with true convection or European convection systems built between 2015-2025. Verify your specific model number for compatibility before ordering.

Frequently Asked Questions


Not sure about your model number? Call 833-899-7278 and we’ll help you confirm. All brand names are the property of their respective owners and are used for compatibility reference only.

BUILT TOUGH · PARTS THAT LAST · GUARANTEED

Trusted Family Business

30 years of Excellence in Appliance Parts

Whether you need a refrigerator water filter, a replacement burner for your stove, or a dryer belt, XPart Supply has you covered. We carry a wide selection of appliance parts in Kitchener-Waterloo for all major brands, including washers, dryers, refrigerators, dishwashers, ovens, and more.

We also offer used appliances and scratch-and-dent appliances in Kitchener-Waterloo, providing affordable, reliable options for customers looking to save money without sacrificing performance. Every appliance is inspected and tested for quality.

For over 30 years, our family-owned business has proudly served the community with quality appliance parts and exceptional service. What started as a small local shop has grown into a trusted name — but we’ve never forgotten our roots. Every customer receives the personal attention and care that only a family-owned business can provide.

When you need appliance parts, used appliances, or scratch-and-dent appliances in Kitchener-Waterloo, trust XPart Supply — Built Tough. Parts That Last.

Years of Experience

Our knowledge has been built over the past 30 years in the business, ensuring expert advice for every appliance need.

Personal Service Guarantee

We treat every customer like family, providing personalized solutions and standing behind our products.

Built on Trust

Our reputation has been built one satisfied customer at a time, creating lasting relationships in our community.

Buy Online Pick Up In-Store

Address
101 Trillium Dr
Kitchener, Ontario N2E 1W8
Phone
Hours
Mon–Fri 9 AM–5 PM • Sat 9 AM–1 PM
Get Directions