Menu


Washer Won't Start? Lid Switch Assembly W11307244 – Fix Lid Lock Failure Fast
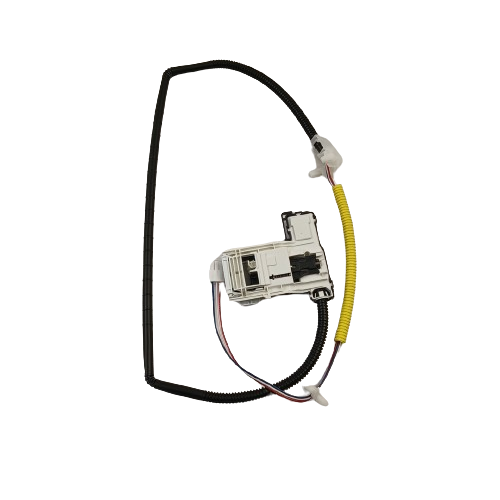
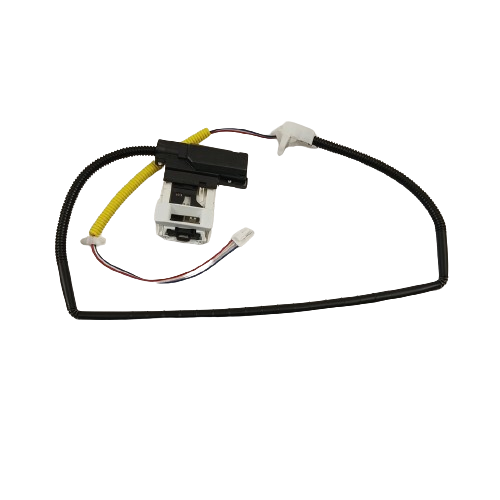
When a top-load washer refuses to start or the lid won't lock, the lid switch assembly is the most common cause. In most Whirlpool, Maytag, and Kenmore top-load washers, this safety interlock detects lid closure and signals the control board to allow wash and spin cycles. When it fails, the machine won't start, stops mid-cycle, or throws lid lock error codes — even when the lid is fully closed. ⚡ Common failure point in Whirlpool-built top-load washers. Part W11307244 is the genuine OEM replacement that restores full lid-lock function and clears error codes immediately.
❓ Is This the Right Part?
This is the correct fix if ALL of the following are true:
- ✔ Washer powers on and the control panel is responsive
- ✔ Other wash functions (water fill, drain) work correctly when manually advanced
- ✔ Water supply and inlet valve confirmed OK
- ✔ Drive motor and belt are intact
- ✔ ONLY problem is the lid won't lock or the washer won't start a cycle
Not sure? Send us your model number — we'll confirm before you order.
🔧 Common Symptoms
- Washer won't start even though the lid is fully closed
- Lid won't lock at the start of the wash cycle
- Lid won't unlock at the end of the cycle — load trapped inside
- Washer stops mid-cycle and won't resume
- Error codes F5E2, F7E1, or lid lock fault on the display
- Control panel shows lid open when it's closed
- Clicking or grinding noise from the lid lock area
- Spin cycle skipped entirely
✔ If these symptoms match, this is the most likely failed component in the system.
✔ In most cases, replacing this lid switch assembly restores normal operation immediately.
📦 Part Details
- Part Number: W11307244
- Type: Lid Switch / Lid Lock Assembly (complete)
- Replaces: OEM direct-fit lid switch assembly — supersedes W10682535, W10838613, W10838613VP, W11253733, WPW10682535, 3948770, AH3948770, EA3948770, PS3948770 (no modification required)
- Brands: Whirlpool, Maytag, Kenmore, Amana, Inglis, Crosley
⚠️ Recommended While Repairing:
Inspect the plastic actuator tab on the lid itself before closing up — if it's cracked or worn, it won't depress the new switch and you'll have a repeat no-start complaint. Replace the actuator tab at the same time if it shows any rounding or cracking.
Inspect the plastic actuator tab on the lid itself before closing up — if it's cracked or worn, it won't depress the new switch and you'll have a repeat no-start complaint. Replace the actuator tab at the same time if it shows any rounding or cracking.
⚙️ Installation
Skill Level: MODERATE — 20–30 minutes. Disconnect power before beginning any repair. Release the cabinet clips at the front of the top panel using a putty knife or flat tool, then hinge the top panel back. Disconnect the wire harness from the old assembly — note connector orientation before unplugging — then snap the new assembly into the mounting bracket and reconnect the harness. Run a test cycle to confirm the lid locks, unlocks, and all error codes are cleared.
✓ Compatible Models
WTW4955HW2, 11022532510, 11020242510, 11020222510, 8TWTW6000JW0, 11022342511, 11022242510, WTW5005KW0, WTW5000DW3, WTW5000DW2, NTW4755EW0, MVWX655DW2, MVWC565FW2, MVWC565FW1, ITW4971EW0, CAW42114GW2, CAW42114GW1, CAW42114GW0, 7MMVWC565FW1, 7MMVWC565FW0, 11025132412, 11022352512, 11022352511, WTW4955HW1, WTW4955HW0, WTW4950HW2, WTW4950HW1, WTW4950HW0, WTW4915EW2, WTW4855HW2, WTW4855HW1, WTW4855HW0, WTW4850HW1, WTW4850HW0, WTW4655JW1, WTW4655JW0, NTW4755EW1, NTW4519JW1, NTW4519JW0, MVWC465HW3, MVWC465HW2, MVWC465HW1, MVWC465HW0, MVWC416FW1, MVWC416FW0, MVWC415EW2, ITW4971EW1, ITW4880HW2, ITW4880HW1, ITW4880HW0, CAW38125HW1, CAW38125HW0, CAW11544EW2, 8TWTW4955JW0, 7MMVWC465JW0, 7MMVWC417FW0, 7MMVWC416FW0, 11025122811, 11025122810, 11022342512, 11022242511, 11020362812, 11020362811, WTW4816FW2, WTW4816FW1, WTW4815EW2, WTW4815EW1, WTW4810EW2, WTW4810EW1, WTW4715EW2, WTW4616FW2, WTW4616FW1, WTW4616FW0, VAW3584GW1, VAW3584GW0, RTW4516FW2, RTW4516FW1, NTW4705EW1, NTW4705EW0, NTW4665GW0, NTW4655EW1, NTW4655EW0, NTW4635EW0, NTW4615EW0, NTW4605EW1, NTW4605EW0, NTW4516FW3, NTW4516FW2, NTW4516FW1, ITW4871FW2, ITW4871FW1, ITW4871FW0, ITW4771EW0, ITW4671EW1, ITW4671EW0, CAW9352EW2, CAW8350EW2, CAW35114GW1, CAW35114GW0, ATW4675EW0, ATW4516HW0, 2DWTW4815GW0, 1CWTW4705GW0, 1105142512, 1105142511, 11022532512, 11022532511, 11020232711, 11020232710, WTW5000DW1, WTW4915EW1, WTW4816FW0, RTW4516FW0, NTW4516FW0, MVWX655DW1, MVWC565FW0, MVWC555DW1, MVWC415EW1, MVWC215EW1, CAW9352EW1, CAW8350EW1, CAW8350EW0, CAW11544EW1, 7MWTW1955EW1, 7MWTW1955EW0, 7MWTW1950EW1, 7MWTW1950EW0, 7MWTW1805EM1, 7MWTW1805EM0, 7MWTW1700EM1, 7MWTW1700EM0, 7MWTW1500EM1, 7MWTW1500EM0, 2DWTW4845EW1, 2DWTW4845EW0, 2DWTW4705EW1, 2DWTW4705EW0, 1CWTW4845EW1, 1CWTW4845EW0, 1CWTW4815EW1, 1CWTW4815EW0, 11025132411, 11022442511. Contact us to verify your model number before ordering.
💡 Pro Tip
Check the Actuator Tab Before Closing Up:
Before reassembling the top panel, inspect the plastic actuator tab on the lid itself. If it's cracked, rounded, or worn down, it won't depress the new switch — and you'll have a repeat no-start complaint after the repair. Replace the actuator tab at the same time if it shows any damage. This is the single most common reason a lid switch repair fails on the first test cycle.
Before reassembling the top panel, inspect the plastic actuator tab on the lid itself. If it's cracked, rounded, or worn down, it won't depress the new switch — and you'll have a repeat no-start complaint after the repair. Replace the actuator tab at the same time if it shows any damage. This is the single most common reason a lid switch repair fails on the first test cycle.
✅Compatibility & Cross Reference
Not sure about your model number? Call 1-877-899-7278 and we’ll help you confirm. All brand names are the property of their respective owners and are used for compatibility reference only.

Buy Online Pick Up In-Store
Address
101 Trillium Dr
Kitchener, Ontario N2E 1W8
Kitchener, Ontario N2E 1W8
Phone
Hours
Mon–Fri 9 AM–5 PM • Sat 9 AM–1 PM

- Choosing a selection results in a full page refresh.


