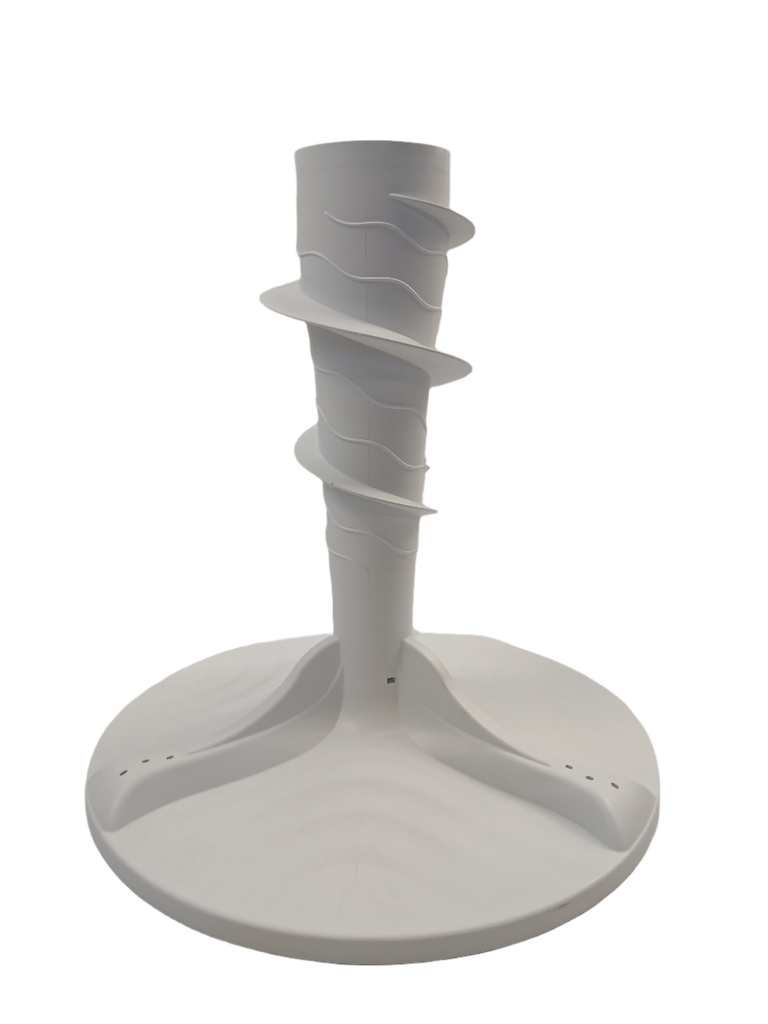
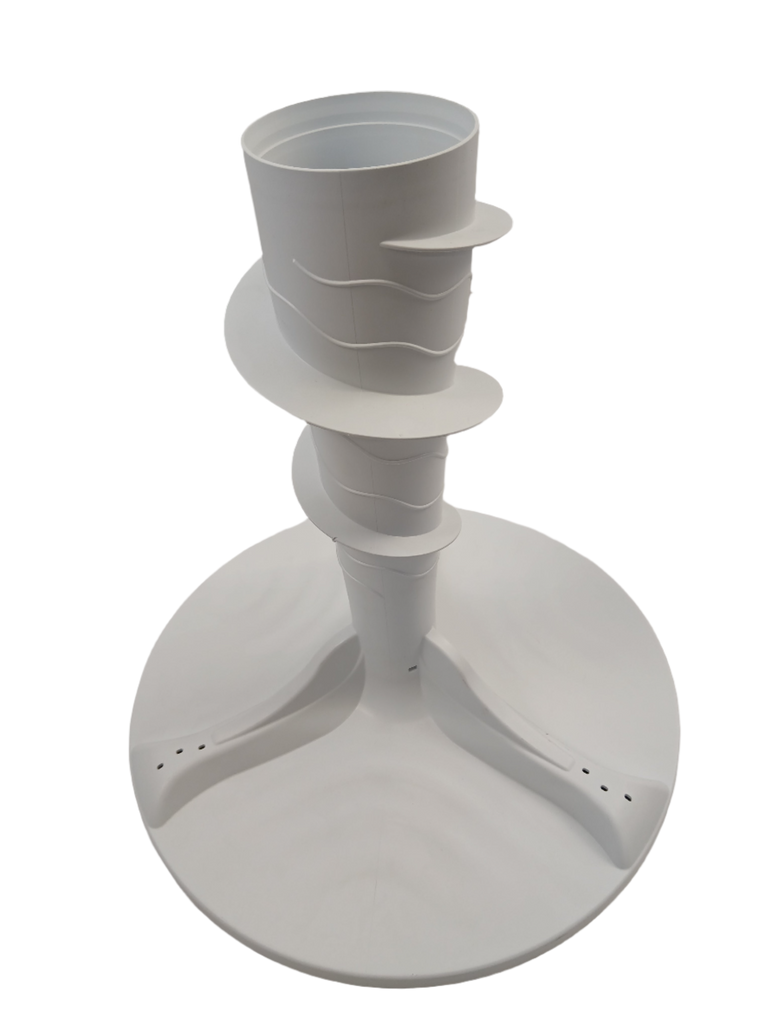
W11550891 Washer Agitator
The W11550891 is a genuine OEM washer agitator assembly for Whirlpool, Maytag, Amana, and Kenmore top-load washing machines. This agitator assembly is a critical component that provides the mechanical agitation action necessary to clean clothes effectively during the wash cycle by moving clothes through the water and detergent solution in a back-and-forth or circular motion. The agitator assembly is a complete, self-contained unit constructed from durable materials including high-impact plastic or composite material (typically polypropylene or ABS plastic, rated for hot water up to 140°F and detergent exposure), a dual-action design with upper and lower sections (the upper section oscillates or rotates independently from the lower section for enhanced cleaning action), internal agitator dogs or cams (ratcheting mechanisms that allow the upper agitator to move in one direction while the lower section moves in the opposite direction), a center spline or drive shaft coupling (connects to the washer transmission drive shaft), internal springs or torsion bars (provide resistance and return force for agitator movement), agitator fins or vanes (protrude from the agitator body to move clothes through the water), a fabric softener dispenser cup (integrated into the top of the agitator on some models), mounting hardware including a center bolt or cap (secures the agitator to the drive shaft), and textured or ribbed surfaces for enhanced fabric movement. The assembly measures approximately 18-24 inches in total height, 12-14 inches in diameter at the base, and weighs approximately 5-8 pounds. The agitator mounts in the center of the washer tub, secured to the transmission drive shaft via a center bolt or splined coupling, and operates through direct mechanical connection to the washer transmission which provides the oscillating or rotating motion during wash cycles. The W11550891 replaces older part numbers including W10821990, W10882734, AP6331556, PS16620354, EAP16620354, and others with improved agitator dog durability, enhanced fin design for better cleaning performance, and stronger plastic formulation to resist cracking and wear. The agitator operates through dual-action mechanical agitation: (1) when the washer transmission activates during the wash cycle, the drive shaft rotates back and forth (oscillates) or rotates continuously depending on washer design; (2) the lower agitator section is directly coupled to the drive shaft and moves with the drive shaft motion; (3) the upper agitator section is connected to the lower section through agitator dogs or cams that act as one-way clutches; (4) as the lower section rotates in one direction, the agitator dogs engage and the upper section moves with it; (5) when the lower section reverses direction, the agitator dogs disengage and the upper section continues moving in the original direction briefly before reversing; (6) this creates a dual-action or counter-rotating motion where the upper and lower sections move independently, creating enhanced water turbulence and fabric movement; (7) the agitator fins and vanes move clothes through the water and detergent solution, providing mechanical cleaning action that removes soil and stains; (8) the agitator operates at varying speeds and stroke lengths depending on cycle selection (gentle cycle uses shorter strokes, heavy-duty cycle uses longer strokes and higher speeds). The agitator typically operates with oscillation angles of 90-180 degrees and frequencies of 60-120 strokes per minute, providing effective cleaning action for all fabric types and soil levels. Over time, agitators can fail due to agitator dog wear or breakage (causing the upper agitator to spin freely without engaging), cracked or broken agitator body or fins (from age, impact, or overloading), stripped or damaged center spline or drive coupling (preventing proper attachment to drive shaft), broken internal springs or torsion bars (reducing agitator resistance and effectiveness), fabric softener dispenser damage or breakage, mounting bolt or cap damage, or manufacturing defects. When the agitator fails, symptoms include the agitator not moving or spinning during wash cycle (agitator dogs failed or drive coupling stripped), the upper agitator spinning freely without resistance (agitator dogs worn or broken), weak or ineffective agitation action (broken springs or worn dogs), clothes not getting clean or tangling around agitator (broken fins or ineffective agitation), loud clicking, grinding, or rattling noise during agitation (broken agitator dogs or damaged internal components), the agitator wobbling or loose on drive shaft (stripped spline or loose mounting bolt), visible cracks or damage to agitator body or fins, or the fabric softener dispenser not working properly. The W11550891 is a complete replacement agitator assembly that restores full agitation performance and eliminates all agitator-related problems. Replacing a faulty agitator eliminates all cleaning performance problems and restores reliable, effective washing machine operation with powerful agitation action. Important: Always unplug the washer before working on it to prevent injury from unexpected washer operation. This is a simple to moderate repair requiring removal of the agitator cap and center bolt, lifting the old agitator off the drive shaft, and installing the new agitator. Verify your washer model number before ordering.
Key Features and Design
Crafted with a sturdy design for heavy-duty use, the W11550891 features durable materials that promote long-lasting operation and consistent performance. It seamlessly replaces older parts like W10821990 and is compatible with a wide range of models, including popular ones such as MVW6230HC0 and WTW5105HW0, ensuring a perfect fit without the need for modifications.
-
Robust Construction: Built to withstand frequent use, this agitator delivers maximum agitation for even cleaning cycles.
-
Versatile Compatibility: Works with various washing machine models to restore optimal function and extend your appliance's lifespan.
-
Easy Installation: Designed for straightforward replacement, helping you get back to efficient laundry routines quickly.
Performance and Benefits
This agitator enhances your washing machine's performance by providing uniform agitation that tackles stubborn stains and dirt, solving issues like uneven cleaning in everyday loads. From XPart Supply Ltd., known for quality parts, it helps save time and money by preventing the need for costly repairs or full machine replacements, ultimately improving your laundry experience with reliable, hassle-free operation.
The W11550891 Washer Agitator is a reliable and long-lasting solution for washing machines. This part is designed to provide an even cycle with maximum agitation throughout the whole washing process. Its sturdy design ensures heavy-duty performance and lasting operation.
Part number W11550891 replaces W10821990, W10882734, W11093899, W11161960, W11162012
Supported Models:
11020372710, 11020372711, 11022352510, 11022352511, 11022352512, 7MMVWC565FW0, 7MMVWC565FW1, CAW42114GW0, CAW42114GW1, CAW42114GW2, MDB4949SKB0, MDB4949SKW0, MDB4949SKZ0, MDB7959SKZ0, MDB9979SKZ0, MVW6230HC0, MVW6230HC2, MVW6230HW0, MVW6230HW2, MVW6230RHW0, MVW6230RHW1, MVW6230RHW2, MVW7230HC0, MVW7230HW0, MVW8230HC0, MVWB765FC1, MVWB765FC2, MVWB765FC3, MVWB765FC4, MVWB765FW0, MVWB765FW1, MVWB765FW2, MVWB765FW3, MVWB765FW4, MVWB766FW0, MVWB766FW1, MVWB865GC0, MVWB865GC1, MVWB865GW0, MVWB865GW1, MVWB965HC0, MVWB965HW0, MVWC565FW0, MVWC565FW1, MVWC565FW2, WDT750SAKB0, WDT750SAKV0, WDT750SAKW0, WDT750SAKZ0, WDTA50SAKB0, WDTA50SAKT0, WDTA50SAKV0, WDTA50SAKW0, WDTA50SAKZ0, WTW5005KW0, WTW5105HC0, WTW5105HC1, WTW5105HC2, WTW5105HW0, WTW5105HW1, WTW5105HW2, ZAW47115GW0