WW01F01951 Washer User Interface Board Assembly (replaces WW01F01731, 233D2322G004)

Sale price
$149.99
Regular price
$272.17
You save
$122.18 (45%)

XPart Number: 9771710447905   |   GTIN: 3513804162791

Buying Options: WW01F01951

Product variant with selected options does not exist!

Frequently Bought Together

Shipper / Seller: XPart Supply Ltd.

Professional: 30-45 minutes
DIY: 60-90 minutes
Difficulty Level: Medium repair (requires careful disassembly and connector handling)

  • User interface display is blank or dim
  • Control panel buttons don't respond or work intermittently
  • Display shows error codes
  • Some buttons work, others don't respond
  • Cycle selections don't register or change randomly
  • Display shows incorrect information or garbled text
  • Washer won't start when button is pressed
  • Timer and cycle progress display don't work
  • Control panel lights up but washer won't operate
  • Buttons require excessive pressure to activate
  • Display flickers or fades in and out
  • Control panel makes beeping sounds without button presses
  • Visible cracks or damage to display or touchpad
  • Moisture or liquid damage to control panel
  • Control panel worked intermittently before failing completely
  • Washer functions work but display doesn't show information
  • Touch screen unresponsive (for touchscreen models)

WW01F01731, 233D2322G004, WH12X10656, WH12X10608, WH12X10462, PS12057081, AP6038235, 3953317, 3953316

Fits Models: (Ctrl+F and Enter Your Model Number)

GE: GFWN1000L0WW, GFWN1000L1WW, GFWN1100L0WW, GFWN1100L1WW, GFWN1600J0WW, GFWN1600J1WW, GFWR2700H0WW, GFWR2700H1WW, GFWR4800F0WW, GFWR4800F1WW

GE (continued): GTW680BSJ0WS, GTW680BSJ1WS, GTW720BSN0WS, GTW720BSN1WS, GTW750CPL0DG, GTW750CPL1DG, GTW840CSN0WS, GTW840CSN1WS, GTW860SPJ0MS, GTW860SPJ1MS

Hotpoint: HTW240ASK0WW, HTW240ASK1WW, HTW240ASK2WW, HTWP1400D0WW, HTWP1400D1WW, HTWP1400D2WW, HTWP1800H0WW, HTWP1800H1WW, HTWP1800H2WW, HTWP2000G0WW

Haier: HWD1600BW1, HWD1600BW2, HWD1600BW3, HWF1600AW1, HWF1600AW2, HWF1600AW3, HWT1600AW1, HWT1600AW2, HWT1600AW3, HLP21N

Note: This is a partial list. This user interface board is used in many GE-manufactured washers built between 2012-2024. Verify your specific model number for compatibility before ordering. Interface boards are model-specific—using an incorrect board will cause malfunction or incompatibility.

Required Tools:

  • Phillips screwdriver
  • Flathead screwdriver
  • 1/4" nut driver
  • Needle-nose pliers
  • Putty knife or trim removal tool
  • Camera or smartphone (for reference photos)
  • Work gloves
  • Towel (to protect washer surface)

Step-by-Step Installation:

  1. Disconnect Power: Unplug the washer from the electrical outlet or turn off the circuit breaker. Never work on the washer with power connected. Wait 5 minutes for capacitors to discharge.
  2. Shut Off Water Supply: Turn off both hot and cold water supply valves behind the washer (optional but recommended for safety).
  3. Remove Dispenser Drawer (if applicable): If your washer has a detergent dispenser drawer, pull it out completely. Press the release tab and remove it from the washer to access screws behind it.
  4. Locate Control Panel Screws: The control panel is typically secured with screws located behind the dispenser drawer cavity, under the control panel trim, or at the rear top corners of the control panel. Look for 2-6 screws depending on your model.
  5. Remove Control Panel Trim (if applicable): Some models have a decorative trim piece covering the control panel screws. Use a putty knife or trim removal tool to carefully pry off the trim. Work gently to avoid breaking clips.
  6. Remove Control Panel Screws: Remove all screws securing the control panel. Keep these screws—you'll need them for reinstallation.
  7. Release Panel Clips: Many control panels also have spring clips or locking tabs along the bottom or sides. Carefully insert a putty knife or flathead screwdriver to release these clips. Work gently to avoid breaking the clips.
  8. Tilt or Lift Control Panel: Once screws and clips are released, carefully tilt the control panel forward and up (for top-load models) or pull it straight off (for front-load models). Support the panel—don't let it hang by the wire harness.
  9. Access Wire Harness Connectors: With the control panel tilted or removed, you'll see wire harness connector(s) on the back of the user interface board connecting it to the main control board inside the washer.
  10. Document Wire Connections: IMPORTANT: Take clear photos of all wire harness connectors showing their positions, orientations, and color coding. Some models have multiple connectors—photograph each one.
  11. Disconnect Wire Harnesses: Press the release tab on each wire harness connector and carefully pull straight off the interface board. Some connectors may be tight—gently wiggle while pulling. Do not pull on the wires themselves, only the connector housings. If there are multiple connectors, label each one.
  12. Remove Interface Board Mounting Hardware: The user interface board is mounted to the control panel housing with screws or clips (typically 2-4 screws). Remove all mounting hardware.
  13. Remove Old Interface Board: Once mounting hardware is removed, carefully lift the old user interface board away from the control panel housing. Handle by the edges—avoid touching electronic components or the display.
  14. Inspect for Damage: Examine the old interface board for visible damage: cracked display, burned components, corroded connectors, or melted plastic. This helps confirm the diagnosis and identify the cause of failure.
  15. Prepare New Interface Board: Remove the new user interface board assembly from its anti-static packaging. Verify it matches the old board in size, button layout, display type, and connector configuration. Handle carefully—avoid touching the display screen or circuit components.
  16. Install New Interface Board: Position the new user interface board into the control panel housing, aligning the mounting holes and ensuring any alignment tabs or guides fit properly.
  17. Secure Interface Board: Install the mounting screws or clips to secure the board to the control panel housing. Tighten firmly but do not overtighten—excessive force can crack the circuit board or plastic housing.
  18. Reconnect Wire Harnesses: Using your reference photos, plug the wire harness connector(s) into the back of the new interface board. Push each connector straight onto the board until you hear or feel a click. Verify each connector is fully seated and locked. Ensure no wires are pinched or stressed.
  19. Verify All Connections: Compare your installation to your reference photos. Ensure every connector is attached properly and no wires are damaged.
  20. Reinstall Control Panel: Carefully position the control panel back into its mounting location on the washer. Align the bottom edge first, then tilt or press the panel into position.
  21. Engage Panel Clips: Press firmly on the control panel to engage any spring clips or locking tabs. You should hear or feel the clips snap into place.
  22. Install Control Panel Screws: Insert and tighten all mounting screws to secure the control panel. Tighten firmly but do not overtighten.
  23. Reinstall Control Panel Trim: If you removed decorative trim, snap it back into position on the control panel.
  24. Reinstall Dispenser Drawer: Slide the dispenser drawer back into its housing until it clicks into place.
  25. Restore Water Supply: Turn on both hot and cold water supply valves (if you turned them off).
  26. Restore Power: Plug the washer back into the electrical outlet or turn on the circuit breaker.
  27. Test Interface Board: The display should light up within a few seconds. Press various buttons to verify all touchpad functions respond correctly. Test cycle selections, option buttons, start/pause, and any special features.
  28. Test Washer Operation: Select a RINSE/SPIN cycle and start the washer. Verify the washer responds to commands, the display shows cycle information correctly, and the washer operates normally through the cycle.
  29. Test All Functions: Test all wash cycles, temperature settings, spin speed options, soil level selections, and any special features (Delay Start, Extra Rinse, etc.) to ensure the new interface board operates correctly.
  30. Monitor for Error Codes: Run a complete wash cycle and monitor the display for any error codes. If error codes appear, verify all wire connections are secure.

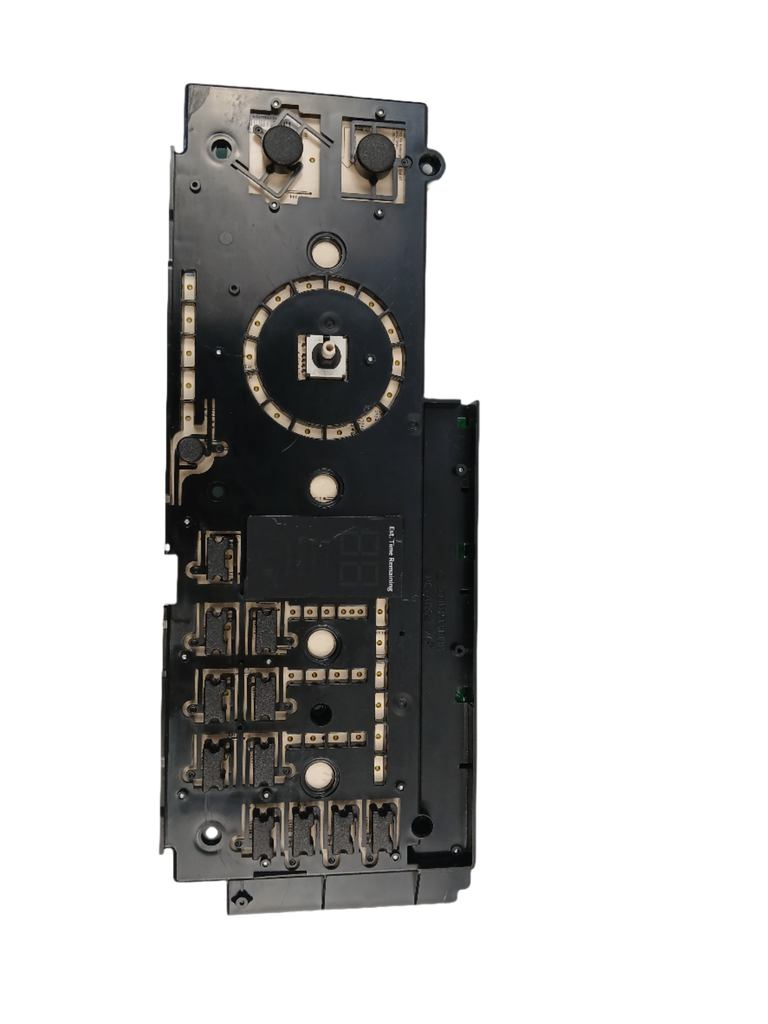
Distinguish between interface board and main control board failures. The user interface board (display and buttons) is separate from the main control board that actually controls washer operations (motor, valves, pump). If your display is blank or buttons don't respond, the interface board is likely faulty. If the display works fine but the washer won't fill, agitate, drain, or spin, or displays error codes related to motor/valve/pump functions, the main control board is likely the problem, not the interface board. Misdiagnosing which board failed wastes money—test systematically before ordering parts.

Test the ribbon cable connection first. Many "interface board failures" are actually just loose or corroded ribbon cable connections between the interface board and the main control board. Before replacing a $100+ interface board, disconnect and reconnect all wire harness connectors. Clean the connector pins with electrical contact cleaner and inspect for corrosion, bent pins, or damage. A poor connection causes intermittent button response, blank displays, or erratic behavior. Sometimes cleaning and reseating connectors solves the problem without replacing anything.

Moisture and detergent damage interface boards permanently. User interface boards are not waterproof. Detergent spills, water splashes from loading wet clothes, and humid laundry room environments cause corrosion on circuit traces and button contacts. Even after drying, corroded components will fail. When replacing an interface board due to moisture damage, also improve your usage habits—wipe up spills immediately, don't overload the dispenser, and ensure proper ventilation. Otherwise your new board will fail the same way within months.

Static electricity destroys interface boards instantly. Always discharge static electricity before handling the new interface board. Touch a grounded metal surface (washer frame, water pipe) before touching the board. Never work on carpet or in low-humidity conditions. Keep the new board in its anti-static packaging until you're ready to install it. One static discharge—which you may not even feel—can destroy sensitive touchpad circuits and render the board useless before you even install it.

Connector orientation matters—don't force it. Wire harness connectors are keyed and can only connect one way. If a connector doesn't slide on easily, don't force it—you have it upside down or misaligned. Forcing a connector on incorrectly bends pins, damages the connector housing, and can destroy the new interface board when power is applied. Always compare your installation to your reference photos and ensure connector alignment tabs match the sockets.

Interface board and main control board must be compatible. User interface boards are programmed to communicate with specific main control board versions. Using an interface board from a different model series—even if it physically fits—will cause communication errors, incorrect displays, or non-functional buttons. Always verify the replacement board is specifically listed for your exact model number. When in doubt, contact the manufacturer or parts specialist to confirm compatibility before ordering.

Allow initialization time after installation. After installing a new interface board and restoring power, the board may take 30-60 seconds to initialize and communicate with the main control board. The display may flash, show test patterns, or cycle through screens during this initialization. This is normal. Don't panic if the display doesn't immediately show the normal home screen. Give it a minute to complete the startup sequence. If the display remains blank or shows errors after 2 minutes, recheck all wire connections.


Whirlpool refrigerator replacement parts, Frigidaire refrigerator replacement parts, GE refrigerator replacement parts, Kenmore refrigerator replacement parts, KitchenAid refrigerator replacement parts, LG refrigerator replacement parts, Maytag refrigerator replacement parts, Whirlpool refrigerator drawers and glides replacement, Whirlpool dishwasher replacement parts, GE dishwasher replacement parts, KitchenAid dishwasher replacement parts, Maytag dishwasher replacement parts, Frigidaire dishwasher replacement parts, Kenmore dishwasher replacement parts, Whirlpool washer replacement parts, GE washer replacement parts, Maytag washer replacement parts, Kenmore washer replacement parts, LG washer replacement parts, Whirlpool dryer replacement parts, GE dryer replacement parts, Maytag dryer replacement parts, Kenmore dryer replacement parts, LG dryer replacement parts, Whirlpool range replacement parts, GE range replacement parts, Whirlpool stove replacement parts, GE stove replacement parts, GE oven replacement parts, GE microwave replacement parts, buy Whirlpool refrigerator parts online, buy GE dishwasher parts online, replacement Kenmore washer parts for sale, buy Maytag dryer parts, LG washer replacement parts online, KitchenAid refrigerator parts for sale, Whirlpool stove and range replacement parts

WW01F01951 Washer User Interface Board Assembly

Upgrade your washer's control system with the WW01F01951 User Interface Board Assembly from XPart Supply Ltd., a reliable replacement part designed for homeowners and technicians seeking seamless operation and enhanced durability in everyday laundry routines.

Key Features and Design

This OEM-quality board features a robust design engineered for long-term performance, compatible with select GE washer models such as GTW680BMK0DG and GTW680BMM0WS. Crafted with high-grade materials, it replaces older parts like WW01F01731 and 233D2322G004, ensuring a precise fit without the need for modifications.

  • Universal compatibility with supported models, including GTW680BMM1DG and GXCH20011AD00, for easy installation.
  • Advanced circuitry that maintains the washer's functionality, focusing on responsive controls and reliable user interaction.
  • Compact and durable build, ideal for withstanding regular use in home environments.

Performance and Benefits

By restoring your washer's user interface, this assembly solves issues like unresponsive buttons or erratic cycles, delivering smoother operation and extending the appliance's lifespan for more efficient laundry days. From XPart Supply Ltd., it offers dependable performance at a great value, helping you save time and reduce the hassle of repairs while ensuring your washer runs like new.

The WW01F01951 Washer User Interface Board Assembly ensures reliable operation and quality performance. It offers a robust design to ensure long-term durability, making it an ideal choice for any washer.

Part number WW01F01951 replaces 233D2322G004, 233D2320G003, S201130A08263, WW01F01731

Supported Models:

GTW680BMK0DG, GTW680BMK0WS, GTW680BMM0WS, GTW680BMM0DG, GXCH20011AD00, GTW680BMM0WS, GTW680BMM0DG, GTW680BMM1WS, GTW680BMM1DG 

Past Part Numbers (Superseded)

WW01F01731, 233D2322G004, WH12X10656, WH12X10608, WH12X10462, PS12057081, AP6038235, 3953317, 3953316

Compatible with the following models

GE: GFWN1000L0WW, GFWN1000L1WW, GFWN1100L0WW, GFWN1100L1WW, GFWN1600J0WW, GFWN1600J1WW, GFWR2700H0WW, GFWR2700H1WW, GFWR4800F0WW, GFWR4800F1WW

GE (continued): GTW680BSJ0WS, GTW680BSJ1WS, GTW720BSN0WS, GTW720BSN1WS, GTW750CPL0DG, GTW750CPL1DG, GTW840CSN0WS, GTW840CSN1WS, GTW860SPJ0MS, GTW860SPJ1MS

Hotpoint: HTW240ASK0WW, HTW240ASK1WW, HTW240ASK2WW, HTWP1400D0WW, HTWP1400D1WW, HTWP1400D2WW, HTWP1800H0WW, HTWP1800H1WW, HTWP1800H2WW, HTWP2000G0WW

Haier: HWD1600BW1, HWD1600BW2, HWD1600BW3, HWF1600AW1, HWF1600AW2, HWF1600AW3, HWT1600AW1, HWT1600AW2, HWT1600AW3, HLP21N

Note: This is a partial list. This user interface board is used in many GE-manufactured washers built between 2012-2024. Verify your specific model number for compatibility before ordering. Interface boards are model-specific—using an incorrect board will cause malfunction or incompatibility.

BUILT TOUGH · PARTS THAT LAST · GUARANTEED

Trusted Family Business

30 years of Excellence in Appliance Parts

Whether you need a refrigerator water filter, a replacement burner for your stove, or a dryer belt, XPart Supply has you covered. We carry a wide selection of appliance parts in Kitchener-Waterloo for all major brands, including washers, dryers, refrigerators, dishwashers, ovens, and more.

We also offer used appliances and scratch-and-dent appliances in Kitchener-Waterloo, providing affordable, reliable options for customers looking to save money without sacrificing performance. Every appliance is inspected and tested for quality.

For over 30 years, our family-owned business has proudly served the community with quality appliance parts and exceptional service. What started as a small local shop has grown into a trusted name — but we’ve never forgotten our roots. Every customer receives the personal attention and care that only a family-owned business can provide.

When you need appliance parts, used appliances, or scratch-and-dent appliances in Kitchener-Waterloo, trust XPart Supply — Built Tough. Parts That Last.

Years of Experience

Our knowledge has been built over the past 30 years in the business, ensuring expert advice for every appliance need.

Personal Service Guarantee

We treat every customer like family, providing personalized solutions and standing behind our products.

Built on Trust

Our reputation has been built one satisfied customer at a time, creating lasting relationships in our community.

Contact Us Customer Service

Hard to find parts? We've got them or we'll find them!

Call now for expert appliance parts assistance

Business Hours: Mon–Fri 9 AM–5 PM • Sat 9 AM–1 PM

Buy Online Pick Up In-Store

Address
101 Trillium Dr
Kitchener, Ontario N2R 1J8
Phone
Hours
Mon–Fri 9 AM–5 PM • Sat 9 AM–1 PM
Get Directions