WW01F01774 Washer Water Inlet Valve (replaces WH13X26535)

Sale price
$59.99
Regular price
$73.90
You save
$13.91 (19%)

XPart Number: 9665286504737   |   GTIN: 3513804182553

Buying Options: OEM
Condition: New

Product variant with selected options does not exist!

Frequently Bought Together

WH13X26535, WH13X10037, WH13X10039, WH13X25565, WH13X25566, PS12067841, AP6885078, 4835702, 4835703

Fits Models: (Ctrl+F and Enter Your Model Number)

GE: GTW330ASK0WW, GTW330ASK1WW, GTW330ASK2WW, GTW335ASN0WW, GTW335ASN1WW, GTW335ASN2WW, GTW460ASJ0WW, GTW460ASJ1WW, GTW460ASJ2WW, GTW465ASN0WW

GE (continued): GTW485ASJ0WS, GTW485ASJ1WS, GTW485ASJ2WS, GTW500ASN0WS, GTW500ASN1WS, GTW500ASN2WS, GTW680BSJ0WS, GTW680BSJ1WS, GTW720BSN0WS, GTW720BSN1WS

Hotpoint: HTW200ASK0WW, HTW200ASK1WW, HTW200ASK2WW, HTW240ASK0WW, HTW240ASK1WW, HTW240ASK2WW, HTWP1400D0WW, HTWP1400D1WW, HTWP1400D2WW, HTWP1800H0WW

Haier: HWD1600BW1, HWD1600BW2, HWD1600BW3, HWF1600AW1, HWF1600AW2, HWF1600AW3, HWT1600AW1, HWT1600AW2, HWT1600AW3, HLP21N

Note: This is a partial list. This water inlet valve is used in many GE-manufactured top-load and front-load washers built between 2010-2024. Verify your specific model number for compatibility before ordering.

Required Tools:

  • Phillips screwdriver
  • Flathead screwdriver
  • 1/4" or 5/16" nut driver
  • Adjustable pliers or channel locks
  • Needle-nose pliers
  • Towels (to soak up water)
  • Bucket or shallow pan (to catch water)
  • Work gloves
  • Flashlight
  • Camera or smartphone (for reference photos)

Step-by-Step Installation:

  1. Disconnect Power: Unplug the washer from the electrical outlet or turn off the circuit breaker. Never work on the washer with power connected.
  2. Shut Off Water Supply: Turn off both hot and cold water supply valves behind the washer. Turn the valves clockwise until fully closed. This is a critical safety step.
  3. Move Washer: Pull the washer away from the wall to provide access to the rear panel. You'll need at least 3 feet of clearance.
  4. Place Towels: Place towels on the floor behind the washer to catch water that will drain from the supply hoses and valve when disconnected.
  5. Disconnect Water Supply Hoses: Using adjustable pliers or channel locks, loosen the hot and cold water supply hoses from the inlet valve. Turn counterclockwise to loosen. Water will drain from the hoses—have towels ready. Once loosened, unscrew the hoses by hand and set them aside.
  6. Inspect Inlet Screens: With the supply hoses disconnected, look into the inlet ports on the valve. You'll see small mesh screens. Inspect these screens for debris, sediment, or mineral buildup. Clean or replace screens if clogged—this is a common cause of slow fill or no fill issues.
  7. Remove Rear Access Panel (if necessary): Some models require removing the rear access panel to access the valve mounting hardware. Remove screws securing the rear panel (typically 4-8 screws around the perimeter). Lift the panel off and set it aside.
  8. Locate Water Inlet Valve: The water inlet valve is mounted at the top rear of the washer where the supply hoses connect. It's a rectangular component with two inlet ports (hot and cold) and one or more outlet ports.
  9. Take Reference Photos: Before disconnecting anything, take clear photos of the inlet valve showing all wire harness connections, hose connections, and mounting orientation.
  10. Disconnect Internal Hoses: The inlet valve has internal hoses that route water from the valve to the tub or dispenser. Use pliers to release the hose clamps (spring clamps or screw clamps) on each outlet port. Slide the clamps away from the connection points. Pull the hoses off the valve outlet ports. Water will drain out—have towels ready.
  11. Disconnect Wire Harnesses: The inlet valve has wire harness connectors for each solenoid (typically 2 connectors, one for hot and one for cold). Press the release tabs and carefully pull the connectors straight off the valve terminals. Do not pull on the wires themselves, only the connector housings.
  12. Remove Mounting Hardware: The inlet valve is secured to the washer frame with mounting screws or clips (typically 2-4 fasteners). Remove all mounting screws. Keep these screws—you'll need them for reinstallation.
  13. Remove Old Valve: Once all connections and mounting hardware are removed, carefully lift the old inlet valve away from the mounting location. Maneuver it out from behind the washer.
  14. Inspect Old Valve: Examine the old valve for visible damage: cracks in the valve body, mineral deposits, corroded solenoid coils, or damaged inlet/outlet ports. Check the inlet screens for debris. This helps confirm the diagnosis and identify the cause of failure.
  15. Clean Mounting Area: Wipe down the valve mounting area on the washer frame. Remove any mineral deposits, rust, or debris. A clean mounting surface ensures proper valve alignment and operation.
  16. Prepare New Valve: Remove the new water inlet valve from its packaging. Verify it matches the old valve in size, inlet/outlet port configuration, mounting hole positions, and wire connector types. Handle carefully—avoid dropping or impacting the valve.
  17. Inspect New Valve Screens: Check the inlet screens on the new valve to ensure they're clean and properly seated. These screens prevent debris from entering the valve and causing failure.
  18. Position New Valve: Carefully position the new inlet valve into the mounting location at the top rear of the washer. Align the mounting holes with the washer frame mounting points. Ensure the inlet ports face outward (toward the rear of the washer) for easy hose connection.
  19. Install Mounting Hardware: Secure the valve with mounting screws or clips. Tighten screws firmly but do not overtighten—excessive force can crack the plastic valve body or strip the mounting holes.
  20. Reconnect Internal Hoses: Push the internal hoses firmly onto the valve outlet ports. The hoses should slide on at least 1-2 inches. Ensure they're fully seated.
  21. Secure Internal Hoses: Slide the hose clamps over the hoses at the outlet connection points. Position the clamps 1/4 to 1/2 inch from the hose ends. Tighten or squeeze the clamps securely. The hoses should not pull off when tugged.
  22. Reconnect Wire Harnesses: Plug the wire harness connectors back onto the inlet valve solenoid terminals. Push each connector straight on until you hear or feel a click. Verify the connections are fully seated and locked. Typically, one connector is for the hot water solenoid and one is for the cold water solenoid—they're usually interchangeable, but verify with your photos.
  23. Verify All Connections: Compare your installation to your reference photos. Ensure all internal hoses are connected, clamps are secure, and wire connectors are attached.
  24. Reinstall Rear Access Panel (if removed): Position the rear access panel back onto the washer. Secure with all mounting screws around the perimeter.
  25. Reconnect Water Supply Hoses: Thread the hot and cold water supply hoses onto the inlet valve inlet ports. Hand-tighten first to ensure proper threading. The hot water hose typically connects to the left port (when facing the rear of the washer), and cold water to the right port—verify with markings on the valve (H and C).
  26. Tighten Supply Hoses: Using adjustable pliers or channel locks, tighten the supply hose connections an additional 1/4 turn beyond hand-tight. Do not overtighten—excessive force can crack the valve body or strip the threads. The connections should be snug but not forced.
  27. Move Washer Back: Push the washer back into position, leaving a small gap from the wall for hose clearance (typically 4-6 inches).
  28. Restore Water Supply: Turn on both hot and cold water supply valves by turning them counterclockwise until fully open.
  29. Check for Leaks (Initial): Immediately after turning on the water supply, check the inlet valve connections for leaks. Look for water dripping from the supply hose connections or valve body. If leaks are present, turn off water supply, tighten connections, and check again.
  30. Restore Power: Plug the washer back into the electrical outlet or turn on the circuit breaker.
  31. Test Inlet Valve Operation: Run a NORMAL wash cycle without clothes. Watch and listen for the inlet valve to operate:The valve should open when the washer starts fillingYou should hear water flowing into the tubBoth hot and cold water should flow (for warm water fill)The valve should close when the water level is reachedNo water should leak from the valve or connections
  32. Verify Hot and Cold Water: During the test cycle, verify both hot and cold water are flowing correctly:Run a HOT water cycle and verify hot water enters the tubRun a COLD water cycle and verify cold water enters the tubRun a WARM water cycle and verify both hot and cold water mix properly
  33. Check for Leaks (Full Test): During the test cycle, monitor the inlet valve area carefully for any water leaks from the valve body, supply hose connections, or internal hose connections. Check both during fill and after the valve closes.
  34. Verify Proper Shut-Off: After the washer reaches the desired water level, verify the inlet valve closes completely and water stops flowing. Listen for any dripping or continuous water flow—the valve should shut off completely.
  35. Full Load Test: Run a complete wash cycle with a normal load of laundry to verify the inlet valve operates properly under normal conditions without leaks or fill issues.

Clean the inlet screens before replacing the valve. An estimated 50% of "inlet valve failures" are actually just clogged inlet screens blocking water flow. Before ordering a replacement valve, turn off water supply, disconnect the supply hoses, and inspect the small mesh screens inside the valve inlet ports. Remove the screens with needle-nose pliers and clean them thoroughly under running water. Remove all sediment, mineral deposits, and debris. Reinstall the screens, reconnect hoses, and test the washer. Many "failed" valves work perfectly after screen cleaning. This diagnostic step saves unnecessary valve replacement costs.

Test the valve solenoids electrically before replacing. Before ordering a new inlet valve, verify the solenoids are actually faulty. With power disconnected, access the valve and disconnect the wire harness connectors. Use a multimeter to test each solenoid coil for continuity—you should read approximately 500-1500 ohms per coil. An infinite reading (OL) means the solenoid coil is open (burned out) and the valve needs replacement. A reading near zero indicates a short circuit. Also test for 120V AC at the wire harness connectors when the washer should be filling—no voltage means the problem is the control board or timer, not the valve.

Check water supply pressure. Inlet valves require minimum water pressure (typically 20 PSI) to operate properly. Low water pressure from the house supply causes slow fill, incomplete fill, or no fill symptoms that mimic valve failure. Before replacing the valve, test water pressure by disconnecting a supply hose and turning on the water supply—water should flow forcefully into a bucket. Weak flow indicates low house pressure, a partially closed supply valve, or clogged supply lines. Installing a new valve won't fix low water pressure problems.

Verify the water level pressure switch is working. The inlet valve works in conjunction with the water level pressure switch (or pressure sensor). The switch tells the control board when the tub is full, and the control board closes the inlet valve. If the pressure switch fails, the valve may not open (no fill) or may not close (overfill). Before assuming the inlet valve is bad, test the pressure switch for proper operation. A failed pressure switch causes the same symptoms as a failed inlet valve but costs half as much to replace.

Use proper hose connection torque. Overtightening supply hose connections is a common cause of inlet valve failure. Excessive torque cracks the plastic valve body, strips the brass threads, or damages the internal valve seats, causing leaks. Hand-tighten the hose connections first, then use pliers to tighten only 1/4 turn beyond hand-tight. That's it—no more. Proper torque prevents valve damage and ensures leak-free connections. Many "defective new valves" were actually damaged during installation by overtightening.

Install a water hammer arrestor if you have water hammer. Water hammer (loud banging when the inlet valve closes) causes shock waves that damage inlet valves, supply lines, and household plumbing. If your washer makes loud banging noises when the water shuts off, install water hammer arrestors on both hot and cold supply lines. These inexpensive devices ($15-25 each) absorb shock waves and protect the inlet valve from damage. Without arrestors, inlet valves fail every 2-3 years. With arrestors, they last 10+ years.

Replace supply hoses when replacing the valve. If your inlet valve failed due to age (8+ years), your supply hoses are also aging and at risk of failure. Rubber supply hoses deteriorate over time and can burst, causing catastrophic water damage. While you have the hoses disconnected for valve replacement, inspect them for cracks, bulges, or deterioration. Consider upgrading to stainless steel braided hoses ($20-30 per pair) that last 15+ years and won't burst. This preventive maintenance prevents thousands of dollars in water damage.

  • No water entering washer (washer won't fill)
  • Washer fills very slowly
  • Only hot water or only cold water fills (not both)
  • Water continuously flows into washer (won't shut off)
  • Water leaks from inlet valve body
  • Water leaks from supply hose connections
  • Washer overfills (water level too high)
  • Washer doesn't advance past fill cycle
  • Washer displays fill error codes
  • Intermittent fill problems (works sometimes, not others)
  • Low water pressure during fill
  • Washer takes too long to fill
  • Water temperature incorrect (cold when should be hot, etc.)
  • Visible damage to valve body or solenoids
  • Inlet valve makes buzzing or humming noise but doesn't fill
  • Mineral deposits or corrosion on valve


Whirlpool refrigerator replacement parts, Frigidaire refrigerator replacement parts, GE refrigerator replacement parts, Kenmore refrigerator replacement parts, KitchenAid refrigerator replacement parts, LG refrigerator replacement parts, Maytag refrigerator replacement parts, Whirlpool refrigerator drawers and glides replacement, Whirlpool dishwasher replacement parts, GE dishwasher replacement parts, KitchenAid dishwasher replacement parts, Maytag dishwasher replacement parts, Frigidaire dishwasher replacement parts, Kenmore dishwasher replacement parts, Whirlpool washer replacement parts, GE washer replacement parts, Maytag washer replacement parts, Kenmore washer replacement parts, LG washer replacement parts, Whirlpool dryer replacement parts, GE dryer replacement parts, Maytag dryer replacement parts, Kenmore dryer replacement parts, LG dryer replacement parts, Whirlpool range replacement parts, GE range replacement parts, Whirlpool stove replacement parts, GE stove replacement parts, GE oven replacement parts, GE microwave replacement parts, buy Whirlpool refrigerator parts online, buy GE dishwasher parts online, replacement Kenmore washer parts for sale, buy Maytag dryer parts, LG washer replacement parts online, KitchenAid refrigerator parts for sale, Whirlpool stove and range replacement parts

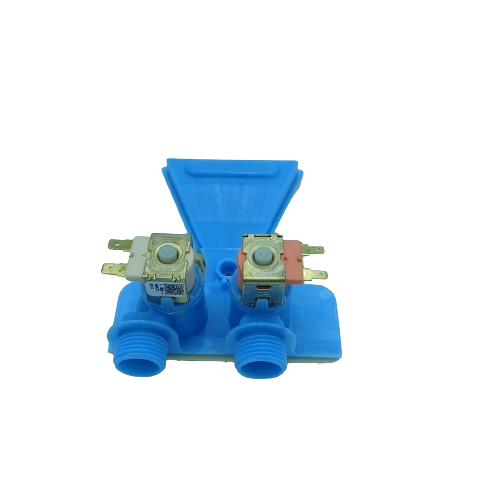
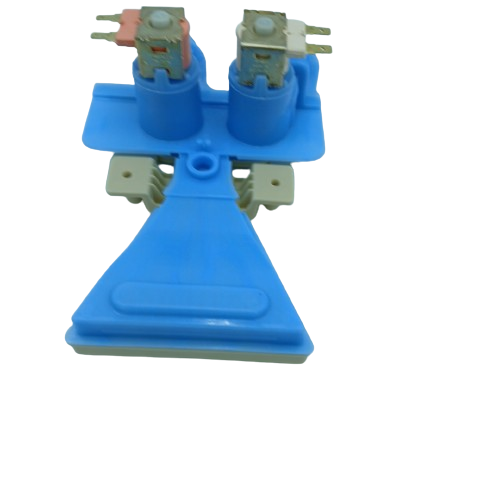
Premium WW01F01774 Washer Water Inlet Valve

Keep your washing machine running efficiently with the WW01F01774 Washer Water Inlet Valve from XPart Supply Ltd., a reliable replacement part designed for homeowners and DIY enthusiasts seeking to restore optimal water flow and prevent common appliance issues.

Key Features and Design

This durable valve is crafted with high-quality materials for long-lasting performance, featuring a precise design that ensures a consistent, leak-free seal. Compatible with models such as GTW460BMK0WW, GTW465BMK1WS, and others, it seamlessly replaces part numbers like WH13X26535, WH13X25296, and WH13X26534 for a perfect fit in your GE or compatible washer.

  • Durable construction: Built to withstand regular use and maintain reliable water distribution.
  • Exact specifications: With a SKU of WW01F01774, it meets strict standards for compatibility and functionality.

Performance and Benefits

This valve effectively solves water flow problems in your washer, such as inconsistent filling or leaks, by providing steady and controlled water entry that enhances overall appliance efficiency and extends its lifespan. From XPart Supply Ltd., known for dependable parts, it offers a cost-effective solution that saves time and money on repairs, ensuring your laundry routine runs smoothly without interruptions.

The WW01F01774 Washer Water Inlet Valve is an essential part of any washer system, ensuring reliable water flow to your appliance. It's made of durable materials and designed with precision to guarantee a consistent, leak-free seal.

Part number WW01F01774 replaces 290D1316G005, WH13X25296 WH13X26534, WH13X26535

Supported Models:

GTW460BMK0WW, GTW460BMK1WW, GTW465BMK0WS, GTW465BMK1WS, GTW485BMK0WS, GTW485BMK1WS, LGA77115CBAB00, LGA77115CBAB01, GTW465BMM0WS, GTW460BMM0WW, GTW485BMM0WS, GTW470BMM0DG, GTW560BMM0WW

Hard to find parts? We've got them or we'll find them!

Over 10,000 New & Used Parts Ready for Pickup

Show this item number to our store staff to help locate the exact part you need
XPART GTIN/UPC NUMBER
9665286504737

XPart Supply Advantage

Your trusted partner for fast, reliable parts delivery across North America

Lightning Fast Shipping

Same-day processing with expedited delivery options across North America

Massive Inventory

Over 10,000 parts in stock and ready to ship immediately

North America Coverage

Comprehensive shipping network covering USA, Canada, and Mexico

Quality Guaranteed

Premium parts with warranty protection and expert customer support

10K+
Parts in Stock
24-48H
Local Delivery
99.8%
Customer Satisfaction
Professional appliance parts warehouse with organized shelving and extensive inventory

Express Warehouse Shipping

Order within the countdown for same-day shipping!

00 Hours
00 Minutes
00 Seconds

In stock orders placed during business hours ship the same day.

Order of $200 or more of eligible items qualify for FREE Shipping.

Same-day shipping deadline has passed

Orders placed now will ship the next business day.

Same-day shipping deadline has passed

Orders placed outside business hours will be processed when we reopen.

Business Hours: Mon–Fri 9 AM–5 PM • Sat 9 AM–1 PM

Trusted Family Business

29 years of Excellence in Appliance Parts

For over 29 years, our family has been dedicated to providing quality appliance parts and exceptional service. What started as a small local business has grown into a trusted name, but we've never forgotten our roots. Every customer receives the personal attention and care that only a family-owned business can provide.

Years of Experience

Our knowledge has been built over the past 29 years in the business, ensuring expert advice for every appliance need.

Personal Service Guarantee

We treat every customer like family, providing personalized solutions and standing behind our products.

Built on Trust

Our reputation has been built one satisfied customer at a time, creating lasting relationships in our community.

Buy Online Pick Up In-Store

Address
101 Trillium Dr
Kitchener, Ontario N2R 1J8
Phone
Hours
Mon–Fri 9 AM–5 PM • Sat 9 AM–1 PM
Get Directions

Contact Us Customer Service

Hard to find parts? We've got them or we'll find them!

Call now for expert appliance parts assistance

Business Hours: Mon–Fri 9 AM–5 PM • Sat 9 AM–1 PM