


Samsung Ice Maker Assembly DA97-18859A — No Longer Available, Fixes Ice Maker Not Producing Ice
DA97-18859A has been discontinued and is no longer available through authorized Samsung supply channels. This listing is maintained for reference and for customers sourcing remaining stock through secondary channels. DA97-18859A was the genuine Samsung OEM ice maker assembly for select RF and DRF series refrigerators, replacing discontinued predecessors DA97-13718C, DA97-13718A, DA97-13718B, DA97-15217D, and DA97-08259A. ⚡ Discontinued Samsung OEM part — no new stock available from Samsung. Part DA97-18859A was the complete automatic ice production system that froze, harvested, and ejected ice cubes into the storage bin.
❓ Is This the Right Part?
This was the correct assembly if ALL of the following apply to your refrigerator:
- ✔ Refrigerator cools normally and water supply to the ice maker is confirmed working
- ✔ Water inlet valve and ice maker water line have been ruled out as the fault
- ✔ Ice maker module is confirmed defective — not producing, not harvesting, or leaking from the mold
- ✔ Model number confirmed as one of the supported Samsung or Dacor models listed below
Not sure if this is the right part for your model? Send us your model number — we may be able to identify an available alternative.
🔧 Common Symptoms This Part Addressed
- Ice maker not producing ice at all
- Ice maker producing ice slowly or incompletely
- Ice not ejecting from the mold — ice stuck or frozen in place
- Ice maker leaking water or making grinding and clicking sounds during harvest
✔ Similar symptoms can also result from a failed water inlet valve, frozen fill tube, ice maker control board, or temperature sensor — confirm the diagnosis before sourcing a replacement assembly.
✔ In most cases where the ice maker module itself was confirmed defective, replacing DA97-18859A restored normal automatic ice production.
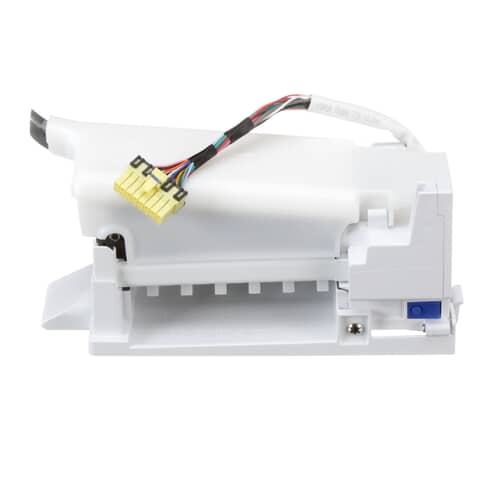
📦 Part Details
- Part Number: DA97-18859A
- Type: Complete refrigerator ice maker assembly — includes ice mold, motor, heating element, and thermostat
- Status: Discontinued — No Longer Available (NLA)
- Replaces: DA97-13718C, DA97-13718A, DA97-13718B, DA97-15217D, DA97-08259A
- Brands: Samsung, Dacor
- Voltage: 120V AC, 60 Hz
If DA97-18859A is confirmed defective in your refrigerator, contact us with your full model number. We may be able to identify a compatible ice maker assembly or XPart equivalent currently in stock.
⚙️ Installation
Skill Level: Moderate — 30 to 45 minutes. Disconnect electrical power and close the water supply valve before servicing. The ice maker assembly mounts to the freezer compartment wall and connects via a wiring harness plug and a water fill tube. Test the water supply line and inlet valve before replacing the ice maker module to confirm the module is the actual fault.
✓ Originally Compatible Models
DA97-18859A was confirmed compatible with the following Samsung and Dacor refrigerator models. Confirm your complete model number and revision before sourcing any replacement. Contact us to verify your model number.
💡 Pro Tip
A failed water inlet valve is the most common cause of ice maker no-production symptoms and is significantly less expensive than the ice maker assembly. Confirm the valve is opening and delivering water to the fill tube before concluding the ice maker module is defective — it can save considerable time and cost on the repair.
✅Compatibility & Cross Reference
Not sure about your model number? Call 1-877-899-7278 and we’ll help you confirm. All brand names are the property of their respective owners and are used for compatibility reference only.
Buy Online Pick Up In-Store
Kitchener, Ontario N2E 1W8


- Choosing a selection results in a full page refresh.


